Nutch On Windows Without Cygwin

Nutch On Windows Without Cygwin
Running nutch on Windows requires the use of cygwin - or so their documentation says. The reason cygwin is required is that under nutch is hadoop, an apache project which actually invokes various GNU utilities to perform some operations (usually file system operations). There are only a handful of places where hadoop executes shell commands and I fully believe these calls could be internalized into native Java code - possibly an interface for platform abstraction. I found this rather sloppy considering the code base is Java who's flagship feature is portability and this is a featured project under the apache project. Quick Link You can download the native Win32 support package
here: https://www.wendangku.net/doc/1e2125987.html,/files/riffelspot/nutch/nutch_win32.zip
Why Not Cygwin
Cygwin is not for everyone and its certainly not for me. There are licensing questions about cygwin and its required magic dll when used in commercial applications. Additionally cygwin is hard to package and encapsulate into an application stack for distribution. We sell complex software for Windows with a simple installer and no prerequisites. Telling my customers they have to install cygwin before installing our software is out of the question. Cygwin is a heavy solution to a minor dependency in this case.
Just Use a Unix Like OS
Thanks for the purist ideology, meanwhile I need to make money. I have been running various forms of unix operating systems at home for 15 years. Thanks.
Without Cygwin
In summary, the short list of shell dependencies can be resolved using binaries built from MinGW / MSYS. Additionally, placement of these dependencies in the file system relative to nutch, path issues, and bootstrapping nutch are additional issues.
Dependencies
I created a package of dependency binaries based on using grep on the hadoop sources. It is possible I have missed something, but this package is tested and works well for my application. Here is a list of the dependencies as I found them: bash.exe chgrp.exe chmod.exe chown.exe
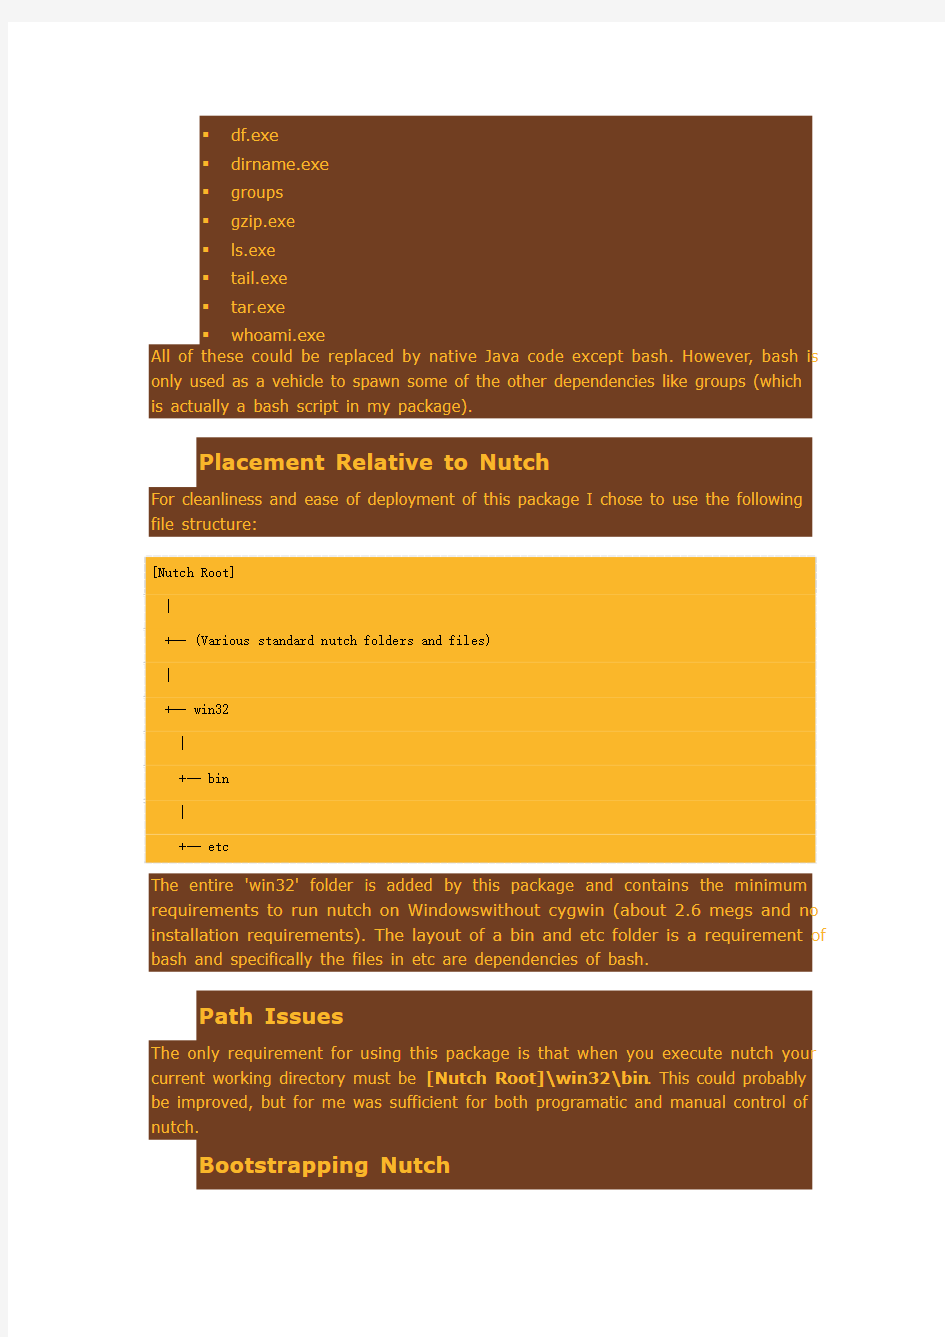
df.exe dirname.exe groups gzip.exe ls.exe tail.exe tar.exe whoami.exe All of these could be replaced by native Java code except bash. However, bash is only used as a vehicle to spawn some of the other dependencies like groups (which is actually a bash script in my package).
Placement Relative to Nutch
For cleanliness and ease of deployment of this package I chose to use the following file structure:
[Nutch Root] | +-- (Various standard nutch folders and files) | +-- win32 | +-- bin | +-- etc
The entire 'win32' folder is added by this package and contains the minimum requirements to run nutch on Windows without cygwin (about 2.6 megs and no installation requirements). The layout of a bin and etc folder is a requirement of bash and specifically the files in etc are dependencies of bash.
Path Issues
The only requirement for using this package is that when you execute nutch your current working directory must be [Nutch Root]\win32\bin. This could probably be improved, but for me was sufficient for both programatic and manual control of nutch.
Bootstrapping Nutch
Nutch
comes
with
its
own
boostrap
shell
script
located
at [Nutch
Root]\bin\nutch. This bootstrap is a bash script that in theory could be run by our dependent bash.exe, which I wasted several hours on. I became frustrated with the issues of translating command line arguments - particularly paths that contained spaces. I decided to write a native win32 batch file replacement for the nutch bash script. You will find it in [Nutch Root]\win32\bin\nutch.bat and as best as I was capable of doing it is directly compatible with the standard nutch bootstrap utility. When reading nutch documentation the [Nutch just substitute [Nutch for Root]\win32\nutch.bat from Root]\win32\bin folder
running [Nutch Root]\bin\nutch.
Putting It All Together
Putting it all together is pretty easy just install Java, download and extract nutch, download and extract this package directly into nutch, and follow your standard instructions while substituting running[Nutch Root]\bin\nutch] with [Nutch Root]\win32\bin\nutch.bat. The only requirement beyond that is to remember your current working directory MUST be [Nutch Root]\win32\bin to get all the paths to work right.
Step By Step
You didn't think I would leave you hanging did you? Really the only important step is number 4 - download and extract the Win32 support package into your favorite nutch folder and just use the nutch.bat file instead of the nutch bash script. However just to be cool I'll give you these step by step instructions:
Step 1: Install Java
Beyond the scope of this document but a prerequisite none the less. Download from Sun, install, and ensure that JAVA_HOME is properly defined in your environment variables.
Step 2: Create Test Folder
As a rule of thumb I always do my preliminary work in a folder with spaces in its name to guarantee my paths are properly handled for later use in my favorite “Program Files” folder - thanks Bill. So lets create the folder “C:\Nutch Test”.
Step 3: Download and Extract Nutch
At the time of writing this article I used the most recent version of nutch which was 1.0. Download and extract nutch in your test folder so you end up with the following structure:
C:\Nutch Test | +-- nutch-1.0
Step 4: Download and Extract Native Win32 Support Package
I have packaged up a single zip file which you extract into your nutch folder which provides native Win32 support free of cygwin. Download the package and extract its contents into your nutch-1.0 folder so you end up with the following structure, note the folder win32 is added by this package:
C:\Nutch Test | +-- nutch-1.0 | +-- (Various standard nutch folders and files) | +-- win32 | +-- bin | +-- etc
You The remaining
can steps are
download loosely based on
the the tutorial
package found
here: https://www.wendangku.net/doc/1e2125987.html,/files/riffelspot/nutch/nutch_win32.zip at https://www.wendangku.net/doc/1e2125987.html,/tutorial8.html#Intranet+Crawling.
Step 5: Setup URL List
Create a URLs folder for nutch and populate it with the URL to https://www.wendangku.net/doc/1e2125987.html,, you should end up with this:
C:\Nutch Test | +-- nutch-1.0 | +-- URLs | +-- gnu.txt <- This file should contain "https://www.wendangku.net/doc/1e2125987.html,"
You
can
download
my
gnu.txt
file
here: https://www.wendangku.net/doc/1e2125987.html,/files/riffelspot/nutch/gnu.txt
Step 6: Configure Nutch
You need to edit two nutch configuration files before you can do any indexing, [Nutch Root]\conf\nutch-site.xml and [Nutch
Root]\conf\crawl-urlfilter.txt. The changes are documented in the tutorial at https://www.wendangku.net/doc/1e2125987.html,/tutorial8.html#Intranet+Crawling. modified versions based on the tutorial: https://www.wendangku.net/doc/1e2125987.html,/files/riffelspot/nutch/nutch-site.xml https://www.wendangku.net/doc/1e2125987.html,/files/riffelspot/nutch/crawl-urlfilter.txt The most important thing is that the allowed host(s) in crawl-urlfilter.txt match the URL listed in gnu.txt or else the indexer will not follow the link and do any indexing. Here are my
Step 7: Execute Nutch Indexer
The most important thing to remember about this package is that you must run nutch.bat from the [Nutch Root]\win32\bin folder. This creates an interesting conundrum for testing the index in that nutch bean is hard wired to look for the index folder relative to the current working directory in a folder named 'crawl'. Roughly this means in order to use nutch bean to test your index you must run the indexer and store the resulting index into [Nutch Root]\win32\bin\crawl. Here it is simplified:
Microsoft Windows XP [Version 5.1.2600] (C) Copyright 1985-2001 Microsoft Corp.
C:\Documents and Settings\Administrator>cd "\Nutch Test\nutch-1.0\win32\bin" C:\Nutch Test\nutch-1.0\win32\bin>nutch crawl "c:\Nutch Test\URLs" -dir "c:\Nutch
Test\nutch-1.0\win32\bin\crawl" -depth 3 -topN 50
[Lots of messages here for about a short while]
crawl finished: c:/Nutch Test/nutch-1.0/win32/bin/crawl
C:\Nutch Test\nutch-1.0\win32\bin>
Step 8: Search the Index
Nutch provides a simple “bean” which can be run from command line to search an index. It is fairly primative and as mentioned above it hard coded to look in the current directory for a directory named 'crawl' which contains the index to search. Since nutch.bat must be used to execute the bean and you must run nutch.bat from [Nutch Root]\win32\bin, the index had to be manually placed at [Nutch Root]\win32\bin\crawl. In a production system you wont be using the nutch bean for searching so you will have the flexibility to provide a path to the index to search. I did it this way just for the simplest test case. So lets execute a search:
C:\Nutch Test\nutch-1.0\win32\bin>nutch org.apache.nutch.searcher.NutchBean "free software"
Total hits: 86 0 20100617120919/https://www.wendangku.net/doc/1e2125987.html,/philosophy/free-sw.html ... The Free Software Definition - GNU Project - Free Software Foundation (FSF) Skip to ... description of how ?free ...
1 20100617120919/https://www.wendangku.net/doc/1e2125987.html,/philosophy/free-doc.html Free Software and Free Manuals - GNU Project - Free Software Foundation (FSF) Skip to ... the Point of Free ... 2 20100617120919/https://www.wendangku.net/doc/1e2125987.html,/software/software.html ... and internships Hardware Database Free Software Directory Free Software Resources Associate Members My FSF ... the Point of Free ... 3 20100617121250/https://www.wendangku.net/doc/1e2125987.html,/licenses/license-list.html ... Table of Contents Introduction Software Licenses GPL-Compatible Free Software Licenses GPL-Incompatible Free Software Licenses Non-Free Software Licenses ... 4 20100617120919/https://www.wendangku.net/doc/1e2125987.html,/philosophy/selling.html ... and internships Hardware Database Free Software Directory Free Software Resources Associate Members My FSF ... the Point of Free ... 5 20100617121250/https://www.wendangku.net/doc/1e2125987.html,/licenses/ ... the FSF! Search: Licenses Published software should be free software . To make it ... to add to free ... 6 20100617121250/https://www.wendangku.net/doc/1e2125987.html,/software/for-windows.html ... and internships Hardware Database Free Software Directory Free Software Resources Associate Members My FSF ... the Point of Free ... 7 20100617120919/https://www.wendangku.net/doc/1e2125987.html,/philosophy/fs-motives.html ... and internships Hardware Database Free Software Directory Free Software Resources Associate Members My FSF ... the Point of Free ... 8 20100617121250/https://www.wendangku.net/doc/1e2125987.html,/philosophy/categories.html ... Alike v2.0 or later. Free software Free software is software that comes with permission for ... single copyleft license. Non-copylefted free ... 9 20100617120919/https://www.wendangku.net/doc/1e2125987.html,/distros/free-distros.html ... include and only propose free software. They reject non-free applications,non-free programming platforms, non-free drivers, or non ...
And there you have it… You have used nutch to partially index https://www.wendangku.net/doc/1e2125987.html, and executed a successful search all without the use of cygwin on Windows.
Notes and Thoughts
One of the more complex issues with this win32 package is the requirement of your current working directory always be [Nutch Root]\win32\bin. Currently nutch.bat will fail to operate properly because it relies on the environment variable %CD% for the current directory to locate nutch using relative paths. This could probably be worked around to remove this requirement but I found another issue that stopped me from worrying about it; Setting the path to [Nutch Root]\win32\bin was not sufficient for nutch to find the binaries and I'm not sure why. The underlying hadoop layer executes the binaries without hard paths and expects the path to allow the location of the files. This should work but it does not. My guess would be that somewhere in the Java path of nutch a process is started that does not inherit the path of nutch.bat. It might be possible to add this path to your permanent Windows path and get this working, but for me that is not an option so I did not explore it any further. Programatic use of nutch classes will probably also require setting your current working directory to [Nutch Root]\win32\bin AND require you to change your path. You should look at nutch.bat to see how the path is configured and replicate that behavior from your code. Hadoop: What gives? Making a shell call to gzip from Java? Are you kidding me, that's just lazy? The shell dependencies in Hadoop are absolutely not necessary and would make this package and others based on hadoop run natively on Windows without dependencies like this - thats the whole point of Java. Your even an official Apache project - shouldn't you be the model of good design?
TinyOS在windows中安装步骤
1.TinyOS 1.1概要 TinyOS应用程序都是有一个或多个组件链接起来,从而形成一个完整的可执行程序。组件中实现了功能接口,同时也能使用其它组件提供的接口。 在接口定义中可以申明命令函数和事件函数,命令函数由接口提供者实现,事件函数由接口使用者实现。对于一个组件而言,如果它要使用某个组件接口中的命令,它必须实现这个接口的事件。一个组件可以使用或提供多个接口以及同一个接口的多个实例。 组件有两种类型:模块(module)和配置(configuration)。模块提供应用程序代码,实现一个或多个接口;配置则是用来将其它组件装配起来,将各个组件所使用的接口与其它组件提供的接口连接在一起,进行导通。每个应用程序都由一个顶级配置所描述,其内容就是将该应用程序所用到的所有组件导通起来,形成一个有机整体。 TinyOS应用程序必须包含Main 组件,Main组件是首先被执行的一个组件。确切的说,在TinyOS 中执行的第一个命令是Main.StdControl.init(),接下来是Main.StdControl.start()。 Main组件完成以下功能:芯片初始化,外围电路初始化,操作系统调度数据结构初始化,子组件初始化,启动子组件件,进入调度死循环从而将控制权交给操作系统,一旦没有任务可以调度就进入休眠状态以降低系统功耗。 TinyOS的调度系统是TinyOS系统的核心部分。它采用先进先出的排队策略,任务之间不可以抢占,但是中断可以抢占任务,中断是否可以抢占中断则是应用程序自己控制的。即如果中断处理程序进入中断以后执行了关中断的操作,那么这个中断将是不可抢占的,否则在服务的过程中就有可能被抢占掉。另外还要注意,在中断服务程序里面是可以创建任务的。 1.2在Cygwin下的安装 在/etc/bash.bashrc文件中增加以下内容: export TOSROOT=/opt/tinyos-2.x export TOSDIR=$TOSROOT/tos export CLASSPATH=C:\cygwin\opt\tinyos-2.x\support\sdk\java\tinyos.jar export CLASSPATH="$CLASSPATH;." export MAKERULES=$TOSROOT/support/make/Makerules export PATH=/opt/msp430/bin:/opt/jflashmm:$PATH 安装以下软件包: rpm -ivh --ignoreos c:/downloads/avr-binutils-2.17tinyos-3.cygwin.i386.rpm rpm -ivh --ignoreos c:/downloads/avr-gcc-4.1.2-1.cygwin.i386.rpm rpm -ivh --ignoreos c:/downloads/avr-libc-1.4.7-1.cygwin.i386.rpm rpm -ivh --ignoreos c:/downloads/avarice-2.4-1.cygwin.i386.rpm rpm -ivh --ignoreos c:/downloads/avr-insight-6.3-1.cygwin.i386.rpm
zn5刷机包修改教程
[系统相关]刷机包制作教程 本帖最后由如此而已于2010-3-17 02:34 编辑 这个是转itfunz的E8的刷机包制作教程,主要给想自己改包的看下 没找到ZN5的,大致的方法是一样的 和转的上一个V8的教程有交集的部分,可以互相参考着看 转自:itfunz 作者:mxio 1楼『解SBF包、压SBF包』 E8的刷机包有两种格式,SBF和SHX。 SHX---一般作为BootLoader的包,有时也作为信号包等等,不常用。 SBF---可DIY的刷机包,本教程讲解SBF包制作。 WINDOWS环境下:(WIN2000 XP 2003 VISTA WIN7测试均可用) 常用到的SBF的解包工具是SBF-Recalc。 我常用的版本是SBF-Recalc 1.2.8,目前已更新至SBF-Recalc 1.2.9。 解包过程: 第一步,打开SBF-Recalc 1.2.8,点击Open Flash-File(打开刷机包文件)
第二步,选择至需要解开的刷机包文件。
第三步,点击Split Flash-File(解开刷机包文件)
结束,查看解开的文件,在SBF刷机包文件同目录下。
解开文件列表: ################################ *.hmg--------------刷机包头文件 # 刷机包必须*RAMDLD.smg------刷机包尾文件# 要有的文件################################ *CG36.smg-----根文件系统 # *CG43.smg-----常用配置 # 可以解开并*CG44.smg-----安全配置 # 修改的*CG46.smg-----语言包 # SMG文件*CG52.smg-----资源包 # ################################ *CG31.smg-----RSA 校正文件 # *CG34.smg-----未知 # *CG35.smg-----开启虚拟内存 # *CG37.smg-----未知 # *CG42.smg-----修改开机LOGO # 不可解开的*CG48.smg-----未知 # SMG文件*CG49.smg-----未知 # *CG50.smg-----未知 #
cygwin安装
Cygwin的安装。 我们可以到Cygwin的官方网站下载Cygwin的安装程序,地址是: https://www.wendangku.net/doc/1e2125987.html,/ 或者直接使用下载连接来下载安装程序,下载连接是: https://www.wendangku.net/doc/1e2125987.html,/setup.exe 下载完成后,运行setup.exe程序,出现安装画面。直接点“下一步”,出现安装模式的对话框,如下图所示: 我们看到有三种安装模式: ?Install from Internet,这种模式直接从Internet安装,适合网速较快的情况; ?Download Without Installing,这种模式只从网上下载Cygwin的组件包,但不安装; ?Install from Local Directory,这种模式与上面第二种模式对应,当你的Cygwin组件包已经下载到本地,则可以使用此模式从本地安装Cygwin。 从上述三种模式中选择适合你的安装模式,这里我们选择第一种安装模式,直接从网上安装,当然在下载的同时,Cygwin组件也保存到了本地,以便以后能够再次安装。选中后,点击“下一步”,
这一步选择Cygwin的安装目录,以及一些参数的设置。默认的安装位置是C:\cygwin\,你也可以选择自己的安装目录,然后选择“下一步”, 这一步我们可以选择安装过程中从网上下载的Cygwin组件包的保存位置,选择完以后,点击“下一步”,
这一步选择连接的方式,选择你的连接方式,然后点击下一步,会出现选择下载站点的对话框,如下图所示, 在这一步,需要注意,为了获得最快的下载速度,我们首先在列表中寻找Cygwin中国镜像的地址:https://www.wendangku.net/doc/1e2125987.html,,如果找到就选中这个地址;如果找不到这个地址,就在下面手动输
自己汇总的cygwin基本使用方法,
Cygwin是一个用于在Windows上模拟Linux环境的软件。 通过cygwin,可以在windows环境下使用linux的程序,像find、tar等一些工具也可以在windows下使用,让我们可以更方便的管理文件。 一、cygwin下的一些常见问题: 1、常见问题说明; a、盘符问题; cygwin命令行中,“/cygdrive/c”等同于“C:\”。 b、更改cygwin默认路径; 新建一个环境变量“HOME”,变量值即为你想要的cygwin打开时的默认路径(例如设为“/cygdrive/d”)。 c、cygwin warning:MS-DOS style path detected: 环境变量中加入“CYGWIN=nodosfilewarning”。 2、常用的一些命令; pwd 显示当前的路径 cygpath -dm "`pwd`" 显示当前的完整路径(即windows格式的路径) cd 改变当前路径,无参数时进入对应用户的home目录 ls 列出当前目录下的文件。此命令有N多参数,比如ls -al ps 列出当前系统进程 kill 杀死某个进程 mkdir 建立目录 rmdir 删除目录 rm 删除文件 mv 文件改名或目录改名 man 联机帮助 less 显示文件的最末几行 ——————————————————————— ls #以默认方式显示当前目录文件列表 ls –a #显示所有文件包括隐藏文件 ls –l #显示文件属性,包括大小,日期,符号连接,是否可读写及是否可执行 ls –color=never *.so > obj #不显示文字颜色,将所有so文件记录到obj文件中 ——————————————————————— cd dir #切换到当前目录下的dir目录//如切到d盘cd d: cd .. #切换到到上一级目录 cd ../.. #切换到上二级目录 cd ~ #切换到用户目录,比如是root用户,则切换到/root下 ——————————————————————— rm file #删除某一个文件
14-Cygwin+Android NDK的安装
Cygwin+Android NDK的安装 本文档为刘长冬的毕业论文实验系统环境搭建说明书的子部分—Cywin+Android NDK的安装文档。本文档详细描述了Cywin+Android NDK安装的方法和过程,为实验系统下一步的设计和开发提供必要的依据。 1.软件的来源 1.1.Cygwin Cygwin是许多自由软件的集合,最初由Cygnus Solutions开发,用于各种版本的Microsoft Windows上,运行UNIX类系统。Cygwin的主要目的是通过重新编译,将POSIX系统(例如Linux、BSD,以及其他Unix系统)上的软件移植到Windows上。Cygwin移植工作在Windows NT、Windows 2000、Windows XP以及Windows Server 2003上比较好,在Windows 95和Windows 98上,相对差劲一些。目前Cygwin由Red Hat等负责维护。 Cygwin包括了一套库,该库在Win32系统下实现了POSIX系统调用的API;还有一套GNU开发工具集(比如GCC、GDB),这样可以进行简单的软件开发;还有一些UNIX系统下的常见程序。2001年,新增了X Window System。 另外还有一个名为MinGW的库,可以跟Windows本地的MSVCRT库(Windows API)一起工作。MinGW占用内存、硬盘空间都比较少,能够链接到任意软件,但它对POSIX规范的实现没有Cygwin库完备。 但糟糕的是,Cygwin不支持Unicode。实际上,除了当前Windows系统以及OEM codepages(例如,一个俄语用户,他的codepages是CP1251和CP866,而不能是KOI8-R、ISO/IEC 8859-5、UTF-8等),Cygwin对其他字符集都不支持。 Red Hat规定,Cygwin库遵守GNU General Public License,但也可以跟符合开源定义的自由软件链接。Red Hat另有价格不菲的许可协议,这样使用Cygwin库的专属软件,就可以进行再发布。 官方网站地址为: https://www.wendangku.net/doc/1e2125987.html,/
moshell常用指令
总结了一些moshell常用指令: moshell [ip] 通过ip进入相应网元的moshell操作界面。 moshell [mgw1] 通过局标进入相应网元的moshell操作界面(需在~:\cygwin\home\YOURUSERID\moshell\sitefiles\ipdatebase文件添加"mgw1 10.201.222.27 mgw"字行)。 lt all 装载本节点所有mo。 lt [motype] 装载本节点相应类型的mo。 l? 查看当前是否有打开log。 l+ 打开log。默认目录为: ~:\cygwin\home\YOURUSERID\moshell_logfiles\logs_moshell\sessionlog\ l- 关闭log。 hi 查看从moshell登陆开始到当前执行过的指令记录(!n可以重执行hi对应编号为n的指令)。 who 查看当前登录本网元的所有用户、ip和登录方式。 wait [time] 可以设置在time时间内禁止本登陆任何操作,超时自动解禁,默认单位为秒/s,也可以是分/m、小时/h,如wait 10m。 ls 文件列表,同dos的dir。 cd [\dir] 同dos的cd。 cat [file] 查看文件内容。 boardtemp 显示板的温度。 vols 查看卷标及占用空间信息。 Pdiff 2244 查传输质量 Lacc vcltp eteloopback 软环 secmode –l [1|2|3] 设置访问方式的安全模式。 ver 打印moshell版本信息。 lhsh [xxyy00] [comand] 进入相关板(xxyy00)执行命令。 run [file] 可批量执行moshell命令行,默认目录为home/YOURUSERID/。 trun [script|http://ip_address/script] 在moshell界面执行同EMAS界面相同的Script文件(可执行ECHO, CREATE, SET, DELETE, ACTION, CHECK, REFRESH, CALL 等命令),默认目录为home/YOURUSERID/。 truni 同trun,不同在于运行Script时忽略所有错误和异常。 cls 清屏。 exit 退出。 h [comand] 查看相应指令的帮助说明。 kget 按照proxy id列出来所有mo(耗时会比较久,执行之前须先执行lt all 获取所有mo,如果直接执行则可获取网元版本及状态相关信息,同get 0)。 hc 对节点进行健康检查,执行前需执行lt all指令,耗时约10分钟,
cygwin常用快捷键总结
Cygwin 总结: 1.Cygwin窗口中进外盘用cd /cygdrive/f 而dos中则直接用d:等 2.Cygwin中需要安装什么工具直接不卸载重新装工具包 https://www.wendangku.net/doc/1e2125987.html,/uid-15070602-id-2779056.html 3.Cygwin快捷键 # Ctrl-U: 擦除一行光标前面的部分。 # Ctrl-H: 擦除光标前面的一个字符。 # Ctrl-D: 终止输入。(退出shell,如果您正在使用shell 的话)。 # Ctrl-C: 终止当前正在运行的程序。 # Ctrl-Z: 暂停程序。 &'') # Ctrl-S: 停止向屏幕输出。 # Ctrl-Q: 重新激活向屏幕输出。 默认的shell,`bash’,有历史编辑和tab 补齐功能。 # up-arrow: 开始历史命令搜索。 # Ctrl-R: 开始增量历史命令搜索,可以按照关键字查查自己用过哪些命令。# TAB: 完整的把文件名输入到命令行。 # Ctrl-V TAB: 输入TAB 而不是扩展命令行。 # Ctrl + P - 上一条命令 # Ctrl + N - 下一条命令 # Ctrl-U: 擦除一行光标前面的部分。 # Ctrl + Y - 粘贴前一Ctrl+U类命令删除的字符,是粘贴不是撤销啊!
下面的应用可能稍稍高级一点点 # !! - 上一条命令 # !-n - 倒数第N条历史命令 # !-n:p - 打印上一条命令(不执行) # !?string?- 最新一条含有“string”的命令 # !-n:gs/str1/str2/ - 将倒数第N条命令的str1替换为str2,并执行(若不加g,则仅替换第一个) 其他一些有用的按键组合。 Ctrl-Alt-Del:挂起或者重新启动系统,这三个按键在Linux下可以轻松地修改成关机的操作,这对于单用户的朋友还是很方便的 # Ctrl + l - 清屏 # Ctrl + A - 光标移到行首 # Ctrl + E - 光标移到行尾 # Ctrl + W - 清除光标之前一个单词 # Ctrl + K - 清除光标到行尾的字符 # Ctrl + T - 交换光标前两个字符 # Ctrl + V - 输入控制字符如Ctrl+v ,会输入^M # Ctrl + F - 光标后移一个字符 # Ctrl + B - 光标前移一个字符 # Ctrl + H - 删除光标前一个字符 # N++F - 光标后移N个单词,N为1时可省略 # N++B - 光标前移N个单词,N为1时可省略 # Left-click-and-drag mouse: 选择并且拷贝到剪贴板。 # Click middle mouse button: 使用剪贴板的内容粘贴。 # Meta-key (Emacs terminology) 传统的是使用Left-Alt-key 4.Cygwin中文乱码vim语法高亮ls颜色显示 打开cygwin作如下配置 1.在任何位置执行vi ~/.bashrc 并在行尾添加如下内容并保存关闭 export LESSCHARSET=latin1 alias less='/bin/less -r' alias ls='/bin/ls -F --color=tty --show-control-chars' export LC_ALL=zh_CN.GBK export LC_CTYPE=zh_CN.GBK export LANG=zh_CN.GBK export OUTPUT_CHARSET="GBK" 2.在任何位置执行vi ~/.inputrc 并在行尾添加如下内容并保存关闭 set meta-flag on set input-meta on set convert-meta off set output-meta on
TinyOS2.x安装
一.TinyOS安装 官方说明: https://www.wendangku.net/doc/1e2125987.html,/tinyos-2.x/doc/html/install-tinyos.html https://www.wendangku.net/doc/1e2125987.html,/index.php/Installing_TinyOS_2.1#Manual_installation_on_your_host_OS_ with_RPMs 开发基础:熟悉Linux环境及常用Linux命令;熟悉嵌入式系统开发流程;精通模块设计的思想;能深刻理解交叉编译和MAKE等概念;熟悉C,nesC两种编程语言;对C++,JAVA有一定了解;对ZigBee协议熟悉且具有一定的通信基础,能深刻理解地址、通道等概念。 1.JAVE JDK 安装 首先,我们安装JAVE 开发工具JAVE JDK : Java SE Development Kit (JDK) 5/6下载地址:https://www.wendangku.net/doc/1e2125987.html,/javase/downloads/index.jsp 下载的默认文件名为:jdk-6u10-windows-i586-p.exe / jdk-1_5_0-windows-i586.exe 安装过程只需下一步……下一步便可…… 然后,我们需要设置电脑的环境变量,需要新建两个环境变量,以便使用JDK 具体过程如下: 右击我的电脑——〉属性——〉高级——〉环境变量——〉 系统变量(S)栏——〉新建(W)——〉新建系统变量对话框 如下图:
变量名(N):JAVA_HOME 变量值(V):JDK安装的路径,默认路径为:C:\Program Files\Java\jdk1.6.0_10 C:\Program Files\Java\jdk1.5.0 变量名(N):CLASSPATH 变量值(V): .;%JAVA_HOME%\lib\dt.jar;%JAVA_HOME%\lib\tools.jar;;%JAVA_HOME%\bin;%JAVA_HOME%\jr e\bin; 在用户变量的PATH中添加:;%JAVA_HOME%\bin:$PATH;%JAVA_HOME%\jer\bin:$PATH; 在系统变量(S)栏选中变量为Path的选项,点编辑 在变量值(V)的末尾添加:;%JAVA_HOME%\bin; ;%JAVA_HOME%\jre\bin; 系统变量里最好也同样再设置一个CLASSPATH。 这样,我们的环境变量已经设置完毕了。 我们可以编个JAVA小程序测试简单的测试一下: 打开记事本,输入下面这个小程序,另存为HelloWorld.java public class HelloWorld { public static void main(String[] args) { System.out.println("Hello, World!"); } }
Cygwin使用指南
Cygwin使用指南 下载: 1. 下载、运行安装向导文件 一开始的下载方法,了解Cygwin的人都知道:就是到: https://www.wendangku.net/doc/1e2125987.html, 中先当个安装向导文件setup.exe,这个是Cygwin的官方下载安装向导文件,而且也只能通过它才能正确下载最新的Cygwin版本(为何?稍后有说明)。 setup.exe下载完毕,双击运行,程序安装向导界面如下图所示: 点击“下一步”继续,准备选择Cygwin的安装方式。 2. 选择安装方式 如上图所示,一共有三种安装方式: (1)Install from Internet:直接从Internet上下载并立即安装(安装完成后,下载好的安装文件并不会被删除,而是仍然被保留,以便下次再安装)。 (2)Download Without Installing:只是将安装文件下载到本地,但暂时不安装。 (3)Install from Local Directory:不下载安装文件,直接从本地某个含有安装文件的目录进行安装。 强烈建议选择第(2)项,以便于能够手工指定安装路径。然后再点击”下一步“。 3. 设置安装文件的本地存储路径 由于我们选择的是直接下载的安装方式,所以必需指定好一个本地下载文件存储目录。安装目录所在的驱动器剩余空间必须足够(若要完全下载,至少需要600M以上的空间)。设置好后,点击“下一步”。 4. 选择连接方式
如上图所示,共有三种连接方式选择: (1)Direct Connection:直接连接。 (2)Use IE5 Settings:使用IE的连接参数设置进行连接。 (3)Use HTTP/FTP Proxy:使用HTTP或FTP代理服务器进行连接(需要输入服务器地址和端口号)。 用户可根据自己的网络连接的实情情况进行选择,一般正常情况下,均选择第一种,也就是直接连接方式。然后再点击“下一步”。 5. 选择下载站点 经过一番搜索,安装向导为我们列出了众多可用的下载镜像站点以供选择,有HTTP的也有FTP的。说实话,这些站点我几乎都试过了一遍,真正能用的能给我留下深刻印象的寥寥无几。这里我只推荐一个站点:https://www.wendangku.net/doc/1e2125987.html,,又快又稳定。用户也可以自由决定倒底用哪个站点进行下载。另外,几个后辍为“.jp”的站点也还过的去,但不推荐。为啥?因为那是小日本的站点。 言归正传,选择好了没?好,点击“下一步”,向导会显示下图所示的信息: 注意!这并不是正式的下载,而只是安装向导从下载镜像站点上获取压缩过的安装列表文件。这个安装列表文件是Cygwin统一指定的,并随着新版本的发布而更新。安装向导就是通过它来得知究竟可以下载什么不能下载什么。并且该下载列表文件中还有包含有每个下载文件的MD5验证码,非常重要。 6. 选择所要下载/安装的安装包内容 安装列表文件下载完毕,向导会显示列表中的内容,供用户自由选择倒底需要下载哪些安装包。如何选择呢?只需用鼠标点击每个安装包名后面那个循环箭头图标即可:图标后面的文字是表示究竟对该安装包采取何种下载/安装方式,并随着点击而不断变化,共有这么几类:
C++开发工具
C/C++开发常用工具 开发环境 ---->Turbo c DOS时代c语言开发的经典工具,目前适合两类人使用:c语言beginner(尤其是学生一族),具有怀旧情节的专业人士:) ---->Visual C++ 6.0/7.0 稳定而强大的IDE开发环境,具有丰富的调试功能,定制宏的功能也是其一大特色。Microsoft的经典之作,功能强大自不必言说。附带的一些工具也很不错,比如:Spy++。但编译器较之同类,支持c++标准的程度不够好,尤其6.0及以前的版本。 ---->BCB Borland的C++ Builder是可以与VC匹敌的另一个功能强大的IDE,速度和稳定性稍逊,但对c++标准支持的程度较好。 ---->Cygwin Windows平台下的C++编译器,基于gcc,又完全兼容Window特有的东西,比如对winsock的支持。 ---->Dev-c++ Windows平台下,一个类似VC、BCB的c++ IDE开发环境,属于共享软件。界面亲切优雅,size也不大,其4.9.x版有中文语言支持,无需汉化。编译器基于gcc,完全支持STL。但是对于规模较大的软件项目,恐怕难以胜任。 ---->Source Insight 有着和Dev c++一样漂亮的界面,提供代码的编辑和察看功能,具有丰富的语法加亮功能,可以像VC一样自动弹出成员函数的提示,并具有快速方便的函数跳转功能(但是跳转速度似乎有点慢)。只是默认设置不适合时,需要仔细的调整和修改。无法查找经typedef 之后的名字。
辅助工具 ---->Visual Assist VC IDE环境下的辅助编程工具,能识别各种关键字、函数、成员变量,自动给出tip,并自动更正大小写错误,标示拼写错误等。是VC开发的良好伴侣。 ---->Understand for C++ 一款c/c++IDE编程的辅助工具,支持反向工程,代码导向和一些统计功能。 程序编辑器 ---->EditPlus 一款很不错的文本编辑软件,功能强大却又十分轻巧。支持不同语言的语法加亮,还有Project组织功能,具有丰富的自定义功能。通过设置User Tool,可以和其他语言编译器结合,形成一个简单的IDE。 ---->Ultra Edit 功能和EditPlus相当,通过脚本文件提供的配置功能可以定制编辑环境,但自6.0版以后一直没多大变化,就编程而言,自定义设置没有EditPlus方便。 ---->EMACS 公认的世界上功能最多,最复杂的文本编辑器,其实也可以当作程序员用的编辑器。 ---->Visual Slick Edit 一个功能强大的程序员用编辑器。最值得一提的是其定制功能,很好用,可以和EMACS 相比。自带了一套PCODE解释器,用c的语法,还可以挂接动态库。配合mingw一起使用很方便。 ---->IQEdit 全功能的程序员用编辑器,界面很漂亮。
Cygwin + OpenSSH FOR Windows的安装配置
在windows操作系统中,使用Cygwin + OpenSSH开源软件来作为远程连接的安全工具,是一个非常好的方法,得到许多网管人员的青睐。然而要想顺利安装配置好这套软件,对于初学者来说,是有一定难度的。为了使同道们少走弯路,特将本人摸索的经验陈列于此,以供需要者参考。建议在安装配置这套软件之前,最好要初步掌握一些Linux终端操作技能及其技术概念。 以下所述是在Windows XP系统中实践完成,其它Windows系统可参照此文实施。 一、安装Cygwin + OpenSSH 首先打开https://www.wendangku.net/doc/1e2125987.html,网页,点击如下链接: 将会下载一个安装Cygwin的setup.exe文件,然后在欲安装Cygwin + OpenSSH软件的磁盘上创建Cygwin目录,在此我们假定为:C:"Cygwin,运行setup.exe后打开图一: 图一 图一主要提供关于Cygwin软件安装的一些信息,点击下一步后打开图二:
图二 图二提供了三个选项: 第一选项:从Internet上下载并安装所需软件。 第二选项:从Internet上下载所需软件安装包到本地磁盘。 第三选项:从本地磁盘安装包的目录中安装所需软件。 此处选择从Internet上下载并安装所需软件,点击下一步后打开图三: 图三 图三为指定软件安装的目标路径,其它按图上默认的选项选择。点击下一步后打开图四: 图四 图四为指定软件安装包的本地存放路径。点击下一步后打开图五:
图五 图五是选择连接Internet的方式,照图点选Use IE5 Settings,点击下一步后打开图六: 图六 图六是选择下载Cygwin的网站,尽量选离我国近的网站,以提高安装速度。点下一步打开图七:
cygwin常用命令
基本操作命令: ---------------------------------------------------------------------- ---------------------------------------------------------------------- ls #以默认方式显示当前目录文件列表 ls –a #显示所有文件包括隐藏文件 ls –l #显示文件属性,包括大小,日期,符号连接,是否可读写及是否可执行 ls --color=never *.so > obj #不显示文字颜色,将所有so文件记录到obj文件中 ---------------------------------------------------------------------- cd dir #切换到当前目录下的dir目录 cd / #切换到根目录 cd .. #切换到到上一级目录 cd ../.. #切换到上二级目录 cd ~ #切换到用户目录,比如是root用户,则切换到/root下 ---------------------------------------------------------------------- rm file #删除某一个文件 rm -fr dir #删除当前目录下叫dir的整个目录 ---------------------------------------------------------------------- cp source target #将文件source 复制为target cp /root/source . #将/root下的文件source复制到当前目录 cp –av soure_dir target_dir #将整个目录复制,两目录完全一样 cp –fr source_dir target_dir #将整个目录复制,并且是以非链接方式复制,当source目录带有符号链接时,两个目录不相同 ---------------------------------------------------------------------- mv source target #将文件source更名为target ---------------------------------------------------------------------- diff dir1 dir2 #比较目录1与目录2的文件列表是否相同,但不比较文件的实际内容,不同则列出 diff file1 file2 #比较文件1与文件2的内容是否相同,如果是文本格式的文件,则将不相同的内容显示,如果是二进制代码则只表示两个文件是不同的
windows2003+cygwin+ssh
在Windows2003中配置ssh服务 在vm里成功做了一个ssh服务器,以下对这个过程做个总结。 步骤一:在vm win2k3里安装cygwin环境,虚拟机上不了外网,所以就在我的工作机上下载了一个cygwin的安装包,完整的,640M。 把这个包拷贝到虚拟机里面,完全安装, 安装的中间出现很奇怪的进度显示,如下所示。
安装了很长时间,至少有1h,完成之后,双击cygwin无法使用。在另一台虚拟机里也试着安装了一下,也是没有成功。很郁闷。 步骤二:把我自己的工作机(winxp)上的cygwin的安装包压缩后传到vm上,1,8G ,上传之后解压到C盘。 到cygwin目录下,双击Cygwin.bat,成功打开bash环境。在桌面上做了一个快捷键。如下。
步骤三:配置ssh服务器。 1)添加环境变量CYGWIN和path。
2)授权。 chmod +r /etc/group chmod +r /etc/passwd chmod +rwx /var 3)安装sshd服务 $ ssh-host-config # 引导SSH服务配置 *** Info: Generating /etc/ssh_host_key *** Info: Generating /etc/ssh_host_rsa_key *** Info: Generating /etc/ssh_host_dsa_key *** Info: Creating default /etc/ssh_config file *** Info: Creating default /etc/sshd_config file *** Info: Privilege separation is set to yes by default since OpenSSH 3.3. *** Info: However, this requires a non-privileged account called 'sshd'. *** Info: For more info on privilege separation read /usr/share/doc/openssh/READ ME.privsep. *** Query: Should privilege separation be used? (yes/no) yes #输入yes *** Info: Updating /etc/sshd_config file *** Warning: The following functions require administrator privileges!
cygwin安装卸载
cygwin安装卸载 不会安装linux系统,不会配置工作环境是不能想象的。(事实上,确实要了解很多东西的原理,不然很难排错:诸如,硬盘引导器的引导原理、分区结构原理及linux分区结构和文件系统、环境变量的设置、种类繁多的压缩包安装包的解压安装方法、用户管理权限管理等常用命令、以至于驱动安装系统中文化等等异常琐碎的东东)。 一、cygwin是什么? cygwin是一个在windows平台上运行的 linux模拟环境,因为linux 也满足POSIX规范,所以在运行机制上跟unix相近。 cygwin的工作机制:cygnus当初首先把gcc,gdb,gas等开发工具进行了改进,使他们能够生成并解释win32的目标文件。然后,他们要把这些工具移植到windows平台上去。一种方案是基于win32 api对这些工具的源代码进行大幅修改,这样做显然需要大量工作。因此,他们采取了一种不同的方法——他们写了一个共享库(就是cygwin.dll),把win32 api中没有的unix风格的调用(如fork,spawn,signals,select,sockets等)封装在里面,也就是说,他们基于 win32 api写了一个unix系统库的模拟层。这样,只要把这些工具的源代码和这个共享库连接到一起,就可以使用unix主机上的交叉编译器来生成可以在windows平台上运行的工具集。以这些移植到windows平台上的开发工具为基础,cygnus又逐步把其他的工具(几乎不需要对源代码进行修改,只需要修改他们的配置脚本)软件移植到windows上来。这样,在windows平台上运行bash和开发工具、用户工具,感觉好像在unix上工作。关于cygwin实现的更详细描述,请参考https://www.wendangku.net/doc/1e2125987.html,/cygwin-ug-net/highlights.html 二、cygwin的安装。 step1. 下载后,点击安装文件(setup.exe)进行安装, step2. 安装模式有"Install from Internet"、"Download form Internet"、"Install from Local Directory" 三种. step3. 接下来是选择安装目的路径和安装源文件所在的路径,之后就进入了选择安装包所在的路径。 + All Default + Admin Default .... 如上图所示,在某个节点上双击,就可以改变它的状态,如Default、Install、Uninstall、Reinstall四种状态。默认的都是Default状态,很多工具的默认状态都是不安装。在这里选择了在All这一行上后面的Default上点Install,全部安装,以免后患。 step4. 点下一步,安装成功。它会自动在你的桌面上建立一个快捷方式。 三.cygwin卸载 具体步骤如下:
Windows下通过cygwin架设sshd服务
sshd服务是一种安全连接,它能让你访问服务器上的命令行界面。Windows本身没有提供该服务,所以我们可以通过cygwin来进行安装。 安装 cygwin 首先安装 cygwin。安装时间为 2006-10-8,Cygwin DLL版本为 1.5.21-1。除了默认的软件包之外,又增加了以下软件包。 ?Admin o cron-3.0.1-19 o cygrunsrv-1.17-1 o shutdown-1.7-1 o syslog-ng-1.6.11-1 ?Archive o unzip-5.50-5 o zip-2.3-6 ?Devel o subversion-1.3.2-1 ?Editors: o vim-7.0.076-1 ?Interpreters o gawk-3.1.5-4 o perl-5.8.7-5 o expat-1.95.8-1 ?Libs ?Net o lftp-3.5.1-1 o openssh-4.4p1-1 o openssl-0.98d-1 o openssl097-0.9.7l-1 o ping-1.0-1 o netcat-1.10-2 ?Shells o ash-20040127-3 o bsah-3.1-9 o bash-completion-20060301-1 o mc-4.6.1-2 ?Utils o patch-2.5.8-8 o time-1.7-1 ?Web o wget-1.10.2-1
安装 用管理员用户登录,启动 cygwin 命令行,执行以下命令。 $ ssh-host-config Generating /etc/ssh_host_key Generating /etc/ssh_host_rsa_key Generating /etc/ssh_host_dsa_key Generating /etc/ssh_config file Privilege separation is set to yes by default since OpenSSH 3.3. However, this requires a non-privileged account called 'sshd'. For more info on privilege separation read /usr/doc/openssh/README.privsep. Shall privilege separation be used? (yes/no) yes Warning: The following function requires administrator privileges! Shall this script create a local user 'sshd' on this machine? (yes/no) yes Generating /etc/sshd_config file Added ssh to /cygdrive/c/WINDOWS/system32/drivers/etc/services Do you want to install sshd as service? (Say "no" if it's already installed as service) (yes/no) yes Which value should the environment variable CYGWIN have when sshd starts? It's recommended to set at least "ntsec" to be able to change user context without password. Default is "ntsec". CYGWIN=binmode ntsec tty The service has been installed under LocalSystem account. To start the service, call `net start sshd' or `cygrunsrc -S ssdh'. Host configuration finished. Have fun! 配置 sshd 在 cygwin 的命令行中输入以下命令: $ cd /etc $ chmod 666 sshd_config $ vi sshd_config 修改 sshd_config 的以下配置。
新手在Windows上运行Linux的命令操作方法
新手在Windows上运行Linux的命令操作方法 在windows上可以运行或使用Linux下面的命令吗?可以,小编今天就来分享怎么样让Windows支持Linux命令,做这些安装和设置后,就可以非常方便的在windows系统中使用Linux下面的命令了,对于Linux初学者来说,这个是在windows下练习Linux命令的非常好方法。 首先我们要安装CygwinPortable工具,可以百度搜索下载,也可以在小编的百度云网盘中下载: https://www.wendangku.net/doc/1e2125987.html,/share/link?shareid=3522233410&uk=4278685087#di r/path=%2FTools 若是下载小编百度云网盘中的,安装方法非常简单,加压缩后,双击CygwinPortable.exe就可以安装了,如下图所示: CygwinPortable工具的默认安装位置是C:\CygwinPortable,打开下面这个目录,并复制下面的路径信息备用: C:\CygwinPortable\App\Cygwin\bin
在我的电脑上面点右键,然后在弹出菜单中选择最下面的“属性”,之后会打开关于“系统”的设置项 点击左边列表中的“高级系统设置”,打开“系统属性”设置对话框,然后在这里我们点击右下方的“环境变量”按钮,打开“环境变量”查看修改对话框
在“环境变量”设置对话框的“系统变量”中找到Path,然后点击下面的“编辑”按钮,我们要把C:\CygwinPortable\App\Cygwin\bin的路径天道到Path中 在打开的“编辑系统变量”中,点击变量值后面的内容,定位到最后,首选输入分号“;”,然后添加C:\CygwinPortable\App\Cygwin\bin,最后依次点击各个确定按钮,完成设置
- 14-Cygwin+Android NDK的安装
- cygwin安装与启动
- MOshell安装流程
- cygwin安装及基本操作方法总结
- win7下ndk安装和cygwin配置
- windows+cygwin+ns-2.30安装全记录
- Cygwin使用指南
- CYGWIN 安装教程
- NetBeans下安装cygwin 进行CC++项目开发
- Backuppc安装与配置
- cygwin的安装及基本命令并举例说明
- cygwin本地安装
- cygwin安装卸载
- cygwin的安装和简单配置
- cygwin安装与设置
- Moshell安装指南
- cygwin下安装make
- Cygwin+Eclipse搭建Hadoop开发环境
- SPIN安装步骤
- win7下 cygwin-easy+ns2.34 安装成功