android+ListView详解

android ListView详解
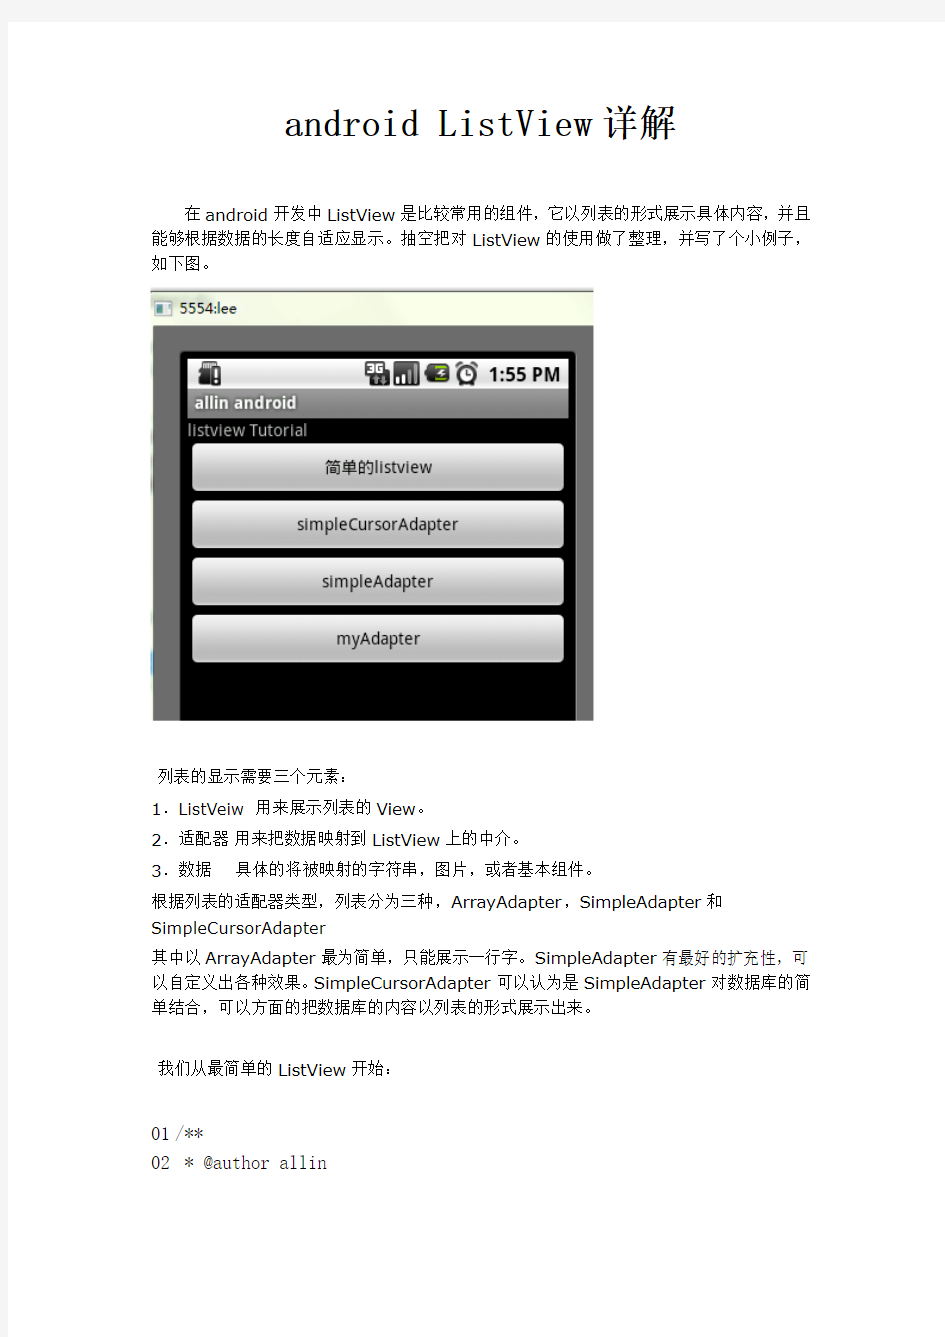
在android开发中ListView是比较常用的组件,它以列表的形式展示具体内容,并且能够根据数据的长度自适应显示。抽空把对ListView的使用做了整理,并写了个小例子,如下图。
列表的显示需要三个元素:
1.ListVeiw 用来展示列表的View。
2.适配器用来把数据映射到ListView上的中介。
3.数据具体的将被映射的字符串,图片,或者基本组件。
根据列表的适配器类型,列表分为三种,ArrayAdapter,SimpleAdapter和SimpleCursorAdapter
其中以ArrayAdapter最为简单,只能展示一行字。SimpleAdapter有最好的扩充性,可以自定义出各种效果。SimpleCursorAdapter可以认为是SimpleAdapter对数据库的简单结合,可以方面的把数据库的内容以列表的形式展示出来。
我们从最简单的ListView开始:
01 /**
02 * @author allin
03 *
04 */
05 public class MyListView extends Activity {
06
07 private ListView listView;
08 //private List
10 public void onCreate(Bundle savedInstanceState){
11 super.onCreate(savedInstanceState);
12
13 listView = new ListView(this);
14 listView.setAdapter(new ArrayAdapter
15 setContentView(listView);
16 }
17
18
19
20 private List
21
22 List
23 data.add("测试数据1");
24 data.add("测试数据2");
25 data.add("测试数据3");
26 data.add("测试数据4");
27
28 return data;
29 }
30 }
上面代码使用了ArrayAdapter (Context context, int textViewResourceId, List
https://www.wendangku.net/doc/6416772986.html,yout.simple_list_item_1是系统定义好的布局文件只显示一行文字,数据
源(一个List集合)。同时用setAdapter()完成适配的最后工作。运行后的现实结构如下图:
SimpleCursorAdapter
sdk的解释是这样的:An easy adapter to map columns from a cursor to TextViews or ImageViews defined in an XML file. You can specify which columns you want, which views you want to display the columns, and the XML file that defines the appearance of these views。简单的说就是方便把从游标得到的数据进行列表显示,并可以把指定的列映射到对应的TextView中。
下面的程序是从电话簿中把联系人显示到类表中。先在通讯录中添加一个联系人作为数据库的数据。然后获得一个指向数据库的Cursor并且定义一个布局文件(当然也可以使用系统自带的)。
01 /**
02 * @author allin
03 *
04 */
05 public class MyListView2 extends Activity {
06
07 private ListView listView;
08 //private List
09 @Override
10 public void onCreate(Bundle savedInstanceState){
11 super.onCreate(savedInstanceState);
12
13 listView = new ListView(this);
14
15 Cursor cursor = getContentResolver().query(People.CONTENT_URI, null, null, null, n ull);
16 startManagingCursor(cursor);
17
18 ListAdapter listAdapter = new SimpleCursorAdapter(this, https://www.wendangku.net/doc/6416772986.html,yout.simple_expandable_list_item_1,
19 cursor,
20 new String[]{https://www.wendangku.net/doc/6416772986.html,},
21 new int[]{android.R.id.text1});
22
23 listView.setAdapter(listAdapter);
24 setContentView(listView);
25 }
26
27
28 }
Cursor cursor = getContentResolver().query(People.CONTENT_URI, null, null, null, null);先获得一个指向系统通讯录数据库的Cursor 对象获得数据来源。
startManagingCursor(cursor);我们将获得的Cursor 对象交由Activity 管理,这样Cursor 的生命周期和Activity 便能够自动同步,省去自己手动管理Cursor 。
SimpleCursorAdapter 构造函数前面3个参数和ArrayAdapter 是一样的,最后两个参数:一个包含数据库的列的String 型数组,一个包含布局文件中对应组件id 的int 型数组。其作用是自动的将String 型数组所表示的每一列数据映射到布局文件对应id 的组件上。上面的代码,将NAME 列的数据一次映射到布局文件的id 为text1的组件上。 注意:需要在AndroidManifest.xml 中如权限: android:name="android.permission.READ_CONTACTS"> 运行后效果如下图: SimpleAdapter simpleAdapter的扩展性最好,可以定义各种各样的布局出来,可以放上ImageView(图片),还可以放上Button(按钮),CheckBox(复选框)等等。下面的代码都直接继承了ListActivity,ListActivity和普通的Activity没有太大的差别,不同就是对显示ListView 做了许多优化,方面显示而已。 下面的程序是实现一个带有图片的类表。 首先需要定义好一个用来显示每一个列内容的xml vlist.xml 01 0 2 0 3 android:orientation="horizontal" android:layout_width="fill_pa rent" 04 android:layout_height="fill_parent"> 05 06 07 08 android:layout_width="wrap_content" 09 android:layout_height="wrap_content" 10 android:layout_margin="5px"/> 11 12 13 android:layout_width="wrap_content" 14 android:layout_height="wrap_content"> 15 16 17 android:layout_width="wrap_content" 18 android:layout_height="wrap_content" 19 android:textColor="#FFFFFFFF" 20 android:textSize="22px" /> 21 22 android:layout_width="wrap_content" 23 android:layout_height="wrap_content" 24 android:textColor="#FFFFFFFF" 25 android:textSize="13px" /> 26 27 28 29 30 下面是实现代码: 01 /** 02 * @author allin 03 * 04 */ 05 public class MyListView3 extends ListActivity { 06 07 08 // private List 10 public void onCreate(Bundle savedInstanceState) { 11 super.onCreate(savedInstanceState); 12 13 SimpleAdapter adapter = new SimpleAdapter(this,getData(),https://www.wendangku.net/doc/6416772986.html,yout.vlist, 14 new String[]{"title","info","img"}, 15 new int[]{R.id.title,https://www.wendangku.net/doc/6416772986.html,,R.id.img}); 16 setListAdapter(adapter); 17 } 18 19 private List 20 List 21 22 Map 24 map.put("info", "google 1"); 25 map.put("img", R.drawable.i1); 26 list.add(map); 27 28 map = new HashMap 29 map.put("title", "G2"); 30 map.put("info", "google 2"); 31 map.put("img", R.drawable.i2); 32 list.add(map); 33 34 map = new HashMap 35 map.put("title", "G3"); 36 map.put("info", "google 3"); 37 map.put("img", R.drawable.i3); 38 list.add(map); 39 40 return list; 41 } 42 } 使用simpleAdapter 的数据用一般都是HashMap 构成的List ,list 的每一节对应ListView 的每一行。HashMap 的每个键值数据映射到布局文件中对应id 的组件上。因为系统没有对应的布局文件可用,我们可以自己定义一个布局vlist.xml 。下面做适配,new 一个SimpleAdapter 参数一次是:this ,布局文件(vlist.xml ),HashMap 的 title 和 info ,img 。布局文件的组件id ,title ,info ,img 。布局文件的各组件分别映射到HashMap 的各元素上,完成适配。 运行效果如下图: 有按钮的ListView 但是有时候,列表不光会用来做显示用,我们同样可以在在上面添加按钮。添加按钮首先要写一个有按钮的xml文件,然后自然会想到用上面的方法定义一个适配器,然后将数据映射到布局文件上。但是事实并非这样,因为按钮是无法映射的,即使你成功的用布局文件显示出了按钮也无法添加按钮的响应,这时就要研究一下ListView是如何现实的了,而且必须要重写一个类继承BaseAdapter。下面的示例将显示一个按钮和一个图片,两行字如果单击按钮将删除此按钮的所在行。并告诉你ListView究竟是如何工作的。效果如下: vlist2.xml 01 0 2 03 android:orientation="horizontal" 04 android:layout_width="fill_parent" 05 android:layout_height="fill_parent"> 06 07 08 09 android:layout_width="wrap_content" 10 android:layout_height="wrap_content" 11 android:layout_margin="5px"/> 12 13 14 android:layout_width="wrap_content" 15 android:layout_height="wrap_content"> 16 17 18 android:layout_width="wrap_content" 19 android:layout_height="wrap_content" 20 android:textColor="#FFFFFFFF" 21 android:textSize="22px" /> 22 23 android:layout_width="wrap_content" 24 android:layout_height="wrap_content" 25 android:textColor="#FFFFFFFF" 26 android:textSize="13px" /> 27 28 29 30 31 程序代码: 001 /** 002 * @author allin 003 * 004 */ 005 public class MyListView4 extends ListActivity { 006 007 008 private List 009 010 @Override 011 public void onCreate(Bundle savedInstanceState) { 012 super.onCreate(savedInstanceState); 013 mData = getData(); 014 MyAdapter adapter = new MyAdapter(this); 015 setListAdapter(adapter); 016 } 017 018 private List 019 List 020 021 Map 023 map.put("info", "google 1"); 024 map.put("img", R.drawable.i1); 025 list.add(map); 026 027 map = new HashMap 028 map.put("title", "G2"); 029 map.put("info", "google 2"); 030 map.put("img", R.drawable.i2); 031 list.add(map); 032 033 map = new HashMap 034 map.put("title", "G3"); 035 map.put("info", "google 3"); 036 map.put("img", R.drawable.i3); 037 list.add(map); 038 039 return list; 040 } 041 042 // ListView 中某项被选中后的逻辑 043 @Override 044 protected void onListItemClick(ListView l, View v, int position, long id) { 045 046 Log.v("MyListView4-click", (String)mData.get(position).get("title")); 047 } 048 049 /** 050 * listview 中点击按键弹出对话框 051 */ 052 public void showInfo(){ 053 new AlertDialog.Builder(this) 054 .setTitle("我的listview") 055 .setMessage("介绍...") 056 .setPositiveButton("确定 ", new DialogInterface.OnClickListener() { 057 @Override 058 public void onClick(DialogInterface dialog, int which) { 059 } 060 }) 061 .show(); 062 063 } 064 065 066 067 public final class ViewHolder{ 068 public ImageView img; 069 public TextView title; 070 public TextView info; 071 public Button viewBtn; 072 } 073 074 075 public class MyAdapter extends BaseAdapter{ 076 077 private LayoutInflater mInflater; 078 079 080 public MyAdapter(Context context){ 081 this.mInflater = LayoutInflater.from(context); 082 } 083 @Override 084 public int getCount() { 085 // TODO Auto-generated method stub 086 return mData.size(); 087 } 088 089 @Override 090 public Object getItem(int arg0) { 091 // TODO Auto-generated method stub 092 return null; 093 } 094 095 @Override 096 public long getItemId(int arg0) { 097 // TODO Auto-generated method stub 098 return 0; 099 } 100 101 @Override 102 public View getView(int position, View convertView, ViewGroup parent) { 103 104 ViewHolder holder = null; 105 if (convertView == null) { 106 107 holder=new ViewHolder(); 108 109 convertView = mInflater.inflate(https://www.wendangku.net/doc/6416772986.html,yout.vlist2, null); 110 holder.img = (ImageView)convertView.findViewById(R.id.img); 111 holder.title = (TextView)convertView.findViewById(R.id.title); 112 https://www.wendangku.net/doc/6416772986.html, = (TextView)convertView.findViewById(https://www.wendangku.net/doc/6416772986.html,); 113 holder.viewBtn = (Button)convertView.findViewById(R.id.view_btn); 114 convertView.setTag(holder); 115 116 }else { 117 118 holder = (ViewHolder)convertView.getTag(); 119 } 120 121 122 holder.img.setBackgroundResource((Integer)mData.get(po sition).get("img")); 123 holder.title.setText((String)mData.get(position).get("title")); 124 https://www.wendangku.net/doc/6416772986.html,.setText((String)mData.get(position).get("info")); 125 126 holder.viewBtn.setOnClickListener(new View.OnClickLis tener() { 127 128 @Override 129 public void onClick(View v) { 130 showInfo(); 131 } 132 }); 133 134 135 return convertView; 136 } 137 138 } 139 140 141 142 143 } 下面将对上述代码,做详细的解释,listView在开始绘制的时候,系统首先调用getCount()函数,根据他的返回值得到listView的长度(这也是为什么在开始的第一张图特别的标出列表长度),然后根据这个长度,调用getView()逐一绘制每一行。如果你的getCount()返回值是0的话,列表将不显示同样return 1,就只显示一行。 系统显示列表时,首先实例化一个适配器(这里将实例化自定义的适配器)。当手动完成适配时,必须手动映射数据,这需要重写getView()方法。系统在绘制列表的每一行的时候将调用此方法。getView()有三个参数,position表示将显示的是第几行,covertView是从布局文件中inflate来的布局。我们用LayoutInflater的方法将定义好的vlist2.xml文件提取成View实例用来显示。然后将xml文件中的各个组件实例化(简单的findViewById()方法)。这样便可以将数据对应到各个组件上了。但是按钮为了响应点击事件,需要为它添加点击监听器,这样就能捕获点击事件。至此一个自定义的listView 就完成了,现在让我们回过头从新审视这个过程。系统要绘制ListView了,他首先获得要绘制的这个列表的长度,然后开始绘制第一行,怎么绘制呢?调用getView()函数。在这个函数里面首先获得一个View(实际上是一个ViewGroup),然后再实例并设置各个组件,显示之。好了,绘制完这一行了。那再绘制下一行,直到绘完为止。在实际的运行过程中会发现listView的每一行没有焦点了,这是因为Button抢夺了listView的焦点,只要布局文件中将Button设置为没有焦点就OK了。 运行效果如下图: Downlod by https://www.wendangku.net/doc/6416772986.html, 试题某工厂的信息管理数据库的部分关系模式如下所示: 职工(职工号,姓名,年龄,月工资,部门号,电话,办公室) 部门(部门号,部门名,负责人代码,任职时间) 问题1]解答(a)PRIMARY KEY(b)FOREIGN KEY (负责人代码)REFERENCES 职工 (c)FOREIGN KEY (部门号)REFERENCES 部门(d)月工资〉=500 AND V月工资=5000,或月工资BETWEEN 500 AND 5000(e)count(*), Sum (月工资),Avg (月工资)(f)GrOup by 部门号 [问题2]解答 (1)该行不能插入“职工”关系,它违反了实体完整性中主码必须惟一区分关系中的每一个属性。 (2)该行可以插入“职工”关系,尽管部门号、电话和办公室为空,但是它表示该雇员没有分配到某个 部门。⑶该行不能插入“职32''关系,它违反了参照完整性。因为6在关系“部门”中不存在。 [问题3]解答(1)和(2)都不能更新,因为使用分组合聚集函数定义的视图是不可更新的。(3)不一定,视子查 询的返回值而定,(4)和(5)允许查询。 [问题4]解答(1)对于外层的职工关系E中的每一个元组,都要对内层的整个职工关系M进行检索,因此查询效率不高。(2)Select 职工号from 职工,(Select Max (月工资)as 最高工资,部门号Group by 部门号)as depMax where 月工资=最高工资and 职工.部门号=depMax .部门号 [问题5]解答Select姓名,年龄,月工资from 职工where 年龄〉45 ; Union Select姓名,年龄,月工资from 职工where 年龄月工资V 1000 ; 试题某仓储超市采用POS(Poi nt of Sale)收银机负责前台的销售收款,为及时掌握销售信息,并依此指导进货,拟建立商品进、销、存数据库管理系统。该系统的需求分析已经基本完成,下面将进入概念模型的设计。 试题解答[问题1]解答 [问题2]解答商品(商品编号,商品名称,供应商,单价)直销商品(商品编号,生产批号,消费期限)库存商品(商品编号,折扣率) [问题3]解答 销售详单(销售流水号,商品编码,数量,金额,收银员,时间)销售日匚总(日期,商品编码,数量) 存货表(商品编码,数量)进货表(送货号码,商品编码,数量,日期) 商品(商品编号,商品名称,供应商,单价)直销商品(商品编号,生产批号,消费期限)库存商品(直显组号,折扣率) [问题4]解答 1 .采用商品信息集中存储在中心数据库中,则在销售前台的每笔计费中,都必须从中心数据库提取 商品名称和单价,增加网络的负载,在业务繁忙时直接影响到前台的销售效率;同时,如果发生网络故障,则该POS机不能工作。采用这种方式,对商品库的更新,如引入新的商品和修改商品价格,会及时体现在前台的销售业务中。2 .采用商品信息存储在中心数据库中,各POS机存储商品表的备份,POS机直 接从本地读取商品信息,减少了网络的负载,可以提高交易的效率;同时即使有短时间的网络故障,也不影响该POS 机的正常使用,只有当存在商品信息变更时才需要与中心数据库同步。采用这种方式,必须在每次商品信息变更时同步各POS机的数据。 [问题5]解答1 .对销售详单关系模式做如下的修改,增加积分卡号属性。销售详单(销售流水号,商品编 精品文档初一数学分)分,每题3一、选择题:(本题共36 的相反数是.-9111?9 )(DC))-9 (B)(A(99 2.下列各式正确的是08?? 54??082???7??(A)(D)(B))C (000320株新鲜花卉、珍贵盆景、罕见2010年11月举办国际花卉博览会,其间展出约3.000320植株,这个数用科学记数法表示,结果正确的是456410?103.2?1032320.?103.2? (C) (A) (D) (B) 把弯曲的河道改直,能够缩短航程,这样做的道理是4. (B)两点确定一条直线(A) 两点之间,射线最短 (D)两点之间,直线最短(C)两点之间,线段最短 5?x ax30a?3x?的解,则是关于的值为5的方程.若11?55?(B) C()(A (D))556.右图是由几个相同的小正方体搭成的一个几何体,从左边看得到的平面图形是 (A)(B)(C)(D) 7.下列运算正确的是 22233532yx?4xy?y5x32x?x4x?3x?x5?xyx?y?(C)B())(DA()8.如图,下列说法中的是 D ACA(经过点A)直线AC DE)射线与直线有公共点(B A E ACD上(C)点在直线CB ACABD D()直线与线段相交于点精品文档. 精品文档 ??????????为9是与倍,则.若互为余角,的2(A)20°(B)30°(C)40°(D)60° 10.在寻找北极星的探究活动中,天文小组的李佳同学使用了如图所示的半圆仪,则下列四 AOB个角中,最可能和∠互补的角为 B)A)(( D)C)((A k?k?1k A化简数轴上的点11.如图,,所表示的数为的结果为10k?2?112k?12k A)1 (B))((C)D(y nm 时,所为两个不相等的有理数,根据流程图中的程序,当输出数值12.已知48、为nm、中较大的数为输入的8D.16. B .24 C48A. 3分)二、填空题:(本题共27分,每空24?x?5x2. 的一次项系数是13.多项式 . 精确到百分位的近似数为14.有理数5.614 ????42?4825?36′. °15.计算:20?4)?(a?6?b a bba? . 满足16. 若有理数的值为、,则得重合,可点的副图17. 如,将一三角板直角顶 关联词语练习题 一.为下面的句子搭上恰当的关联词: 只要……就……如果……就……因为……所以…… 既然……就…… 虽然……但是……不但……而且……即使……也……只有……才…… (1) ()多读多写,作文能力()能得到提高。 (2) 花生()不好看,()很有用。 (3) ()他讲得很动听,()我听得津津有味。 (4) 爷爷()答应了你,你()放心吧! (5)()是数九寒天,我()坚持锻炼。 (6)()刻苦学习,长大()能成为一个合格的建设者。 (7)这座井里的水()清凉,()甘甜。 (8)()没有这个转播台,老山沟里()收不到电视。 二.请你让这两个句子合成一句!要用上合适的关联词哦。 1.小华的字写得很快。小华的字写得很好。 2、有千难万险。千难万险不能阻挡我们前进的步伐。 3.我们多赶几里路。我们要去看一看精彩的武术表演。 4、你没有告诉我。我知道了。 5.我们发动群众。我们很好地完成上级交给我们的任务。 三.请你把失落的孩子找个家,让他们享受到妈妈的爱。 1、下面句子中关联词用地不恰当的一句是() A、如果没有太阳,就没有我们这个美丽可爱的世界。 B、即使下了暴雨,我们就应该来上学。 C、小红虽然年纪小,但是她有远大的理想。 2、下面的句子关联词运用正确的是() A、凡卡即使回到乡下,也改变不了他的命运。 B、只有天不下雨,我们就去春游。 C、王刚的成绩即使很好,才能骄傲。 四.请你用关联词说一句话。 无论……都…… 虽然……却…….尽管……宁可……也不…… 七、选择合适的关联词填空。 1.不但……而且…… 虽然……但是…… 因为……所以…… 如果……就…… 尽管……可是…… 不是……就是…… (1)()我去找小刚,()小刚来找我。 (2)()天天的成绩优秀,()天天的体质较差。 (3)()这个任务很艰巨,()我班能完成这个任务。 (4)妈妈()关心我的学习,()关心我的身体。 (5)()骆驼是沙漠里重要的交通工具,()人们称骆驼为“沙漠之舟”。 2.不光……还…… 只要……就…… 虽然……但是…… 不管……总是…… 既然……就…… 因为……所以…… (1)()太阳离地球太远了,()我们看上去只有盘子那么大。 (2)雷锋叔叔()牺牲了,()他的精神永世长存。 (3)()多读多写,你的作文水平()会提高。 (4)他()多么难做的算术题,()想尽办法把它算出来。 (5)()同学选你当组长,你()要处处起带头作用,把工作做好。 答案1只有才虽然但是因为所以既然就即使也只有才虽然但是如果就 2017 - 2018学年第一学期初一年级期末质量抽测 数学试卷(120分钟 满分100分) 2018.1 一、选择题(本题共8道小题,每小题2分,共16分) 下面各题均有四个选项,其中只有一个是符合题意的. 1. -4的倒数是 A. 4 1- B .41 C .4 D .-4 2. 中新社北京11月10日电,中组部负责人近日就做好中共十九大代表选举工作有关问题答记者问时介绍称,十九大代表名额共2300名,将2300用科学记数法表示应为 A .23×102 B .23×103 C .2.3×103 D .0.23×104 3. 右图是某个几何体的三视图,该几何体是 A .圆柱 B .圆锥 C .球 D .棱柱 4. 质检员抽查4袋方便面,其中超过标准质量的克数记为正数,不足标准质量的克数记为负数,从轻重 的角度看,最接近标准的产品是 A .-3 B .-1 C .2 D .4 5. 有理数a ,b 在数轴上的点的位置如图所示,则正确的结论是 A.4a <- B. 0a b +> C. a b > D. 0ab > 1 2 3 –1 –2 –3 –4 b O E D C B A 6. 如图,已知直线AB ,CD 相交于点O ,OE 平分∠COB ,如果 ∠EOB =55°,那么∠BOD 的度数是 A .35° B .55° C .70° D .110° 7. 用“☆”定义一种新运算:对于任意有理数a 和b ,规定a ☆b = ab 2 + a .如:1☆3=1×32+1=10. 则(-2)☆3的值为 A .10 B .-15 C. -16 D .-20 8. 下列图案是用长度相同的小木棒按一定规律拼搭而成,图案①需8根小木棒,图案②需15根小木棒,……,按此规律,图案⑦需小木棒的根数是 ① ② ③ …… A .49 B .50 C .55 D .56 二、填空题(本题共8道小题,每小题2分,共16分) 9. 234x y -的系数是 ,次数是 . 10. 如右图,想在河堤两岸搭建一座桥,图中四种搭建方式PA ,PB , PC ,PD 中,最短的是 . 11. 计算:23.5°+ 12°30′= °. 12. 写出3 2m n - 的一个同类项 . 13. 如果21(2018)0m n ++-=,那么n m 的值为 . 14. 已知(1)20m m x --=是关于x 的一元一次方程,则m 的值为 . 15. 已知a 与b 互为相反数,c 与d 互为倒数,x 的绝对值等于2,则a+b cdx -的值为 . 16. 右图是商场优惠活动宣传单的一部分:两个品牌分别标 有“满100减40元”和“打6折”. 请你比较以上两种 A B C D P 习题参考答案 第1章习题参考答案 一、选择题 1. C 2. B 3. D 4. C 5. D 6. B 7. A 8. B 9. D 10. B 11. C 12. D 13. D 14. D 15. B 16. C 17. D 18. A 19. D 20. A 21. D 22. D 23. C 24. A 25. C 二、填空题 1. 数据库系统阶段 2. 关系 3. 物理独立性 4. 操作系统 5. 数据库管理系统(DBMS) 6. 一对多 7. 独立性 8. 完整性控制 9. 逻辑独立性 10. 关系模型 11. 概念结构(逻辑) 12. 树有向图二维表嵌套和递归 13. 宿主语言(或主语言) 14. 数据字典 15. 单用户结构主从式结构分布式结构客户/服务器结构浏览器/服务器结构 16. 现实世界信息世界计算机世界 三、简答题 1、简述数据库管理技术发展的三个阶段。各阶段的特点是什么? 答:数据库管理技术经历了人工管理阶段、文件系统阶段和数据库系统阶段。 (1)、人工管理数据的特点: A、数据不保存。 B、系统没有专用的软件对数据进行管理。 C、数据不共 享。D、数据不具有独立性。 (2)、文件系统阶段的特点: A、数据以文件的形式长期保存。 B、由文件系统管理数据。 C、程序与数据之间有一定的独立性。 D、文件的形式已经多样化 E、数据具有一定的共享性 (3)、数据库系统管理阶段特点: A、数据结构化。 B、数据共享性高、冗余度底。 C、数据独立性高。 D、有统一的数据控制功能。 2、从程序和数据之间的关系来分析文件系统和数据库系统之间的区别和联系 答:数据管理的规模日趋增大,数据量急剧增加,文件管理系统已不能适应要求,数据库管理技术为用户提供了更广泛的数据共享和更高的数据独立性,进一步减少了数据的余度,并为用户提供了方便的操作使用接口。数据库系统对数据的管理方式与文件管理系统不同,它把所有应用程序中使用的数据汇集起来,以记录为单位存储,在数据库管理系统的监督和管理下使用,因此数据库中的数据是集成的,每个用户享用其中的一部分。 3、简述数据库、数据库管理系统、数据库系统三个概念的含义和联系。 答:数据库是指存储在计算机内、有组织的、可共享的数据集合。 数据库管理系统是软件系统的一个重要组成部分,它通过借助操作系统完成对硬件的访问,并对数据库的数据进行存取、维护和管理。 数据库系统是指计算机系统中引入数据库后的系统构成。它主要由数据库、数据库用户、计算机硬件系统和计算机软件系统几部分组成。 三者的联系是:数据库系统包括数据库和数据库管理系统。数据库系统主要通过数据库管理系统对数据库进行管理的。 4、数据库系统包括哪几个主要组成部分?各部分的功能是什么?画出整个数据库系统的层次结构图。 答:数据库系统包括:数据库、数据库用户、软件系统和硬件系统。 数据库主要是来保存数据的。 数据库用户是对数据库进行使用的人,主要对数据库进行存储、维护和检索等操作。 软件系统主要完成对数据库的资源管理、完成各种操作请求。 硬件系统主要完成数据库的一些物理上的操作,如物理存储、输入输出等。 七年级上期中测试 1.3 2- 的倒数是 . 2.方程2x -4x =0的解是 . 3.近似数3.05万精确到 位. 4.若单项式-233-n y x 是一个关于x 、y 的五次单项式,则n = . 5.国家投资建设的泰州长江大桥开工,据泰州日报报道,大桥预算总造价是9370000000元人民币,用科学计数法表示为 元. 6.2015中秋发短信送祝福,若每条短信0.1元,则发送a 条短信是 元. 7.列等式表示:x 的4倍与7的和等于20 . 8.观察下面单项式:a ,-2 ,8,4,432a a a -,根据你发现的规律,第6个式子是 . 9.若整式5x -3与x -12互为相反数,则x 的值是 . 10.一个三角形的三边长的比为3:4:5,最短的边比最长的边短6㎝,则这个三角形的周长为 ㎝. 11.下列各项是一元一次方程的是( ) A .2x ―1=0 B .x 1=4 C .4x x 22-=0 D .5x -y =8 12.化简48 56--的结果为( ) A .6 7- B .-76 C .67 D .76 13.下列变形属于移項的是( ) A .由2x =2,得x =1 B .由2 x =-1,得x =-2 C .由3x -27=0,得3x =2 7 D .由-x -1=0,得x +1=0 14.数轴上,在表示-1.5与2 9之间,整数点有( ) A .7个 B .6个 C .5个 D .4个 15.若a =3x ―5,b =x -7,a +b =20,则x 的值为( ) A .22 B .12 C .32 D .8 16.某品牌电脑原价为m 元,先降价n 元,又降低20%后的售价为( ) A .0.8(m +n )元 B .0.8(m -n )元 C .0.2(m +n )元 D .0.2(m -n )元 17.计算:(1)(-38)+52+118+(-62) (2))75.1()3 21()432()323(+------ 关联词练习及答案 一、 1.我们要组织到公园参加游园晚会,你不去,他()不去。 2.天安门广场西侧的人民大会堂()高大,()庄严。 3.我问小刚:“你()参加美术小组,()参加航模小组?” 4.小刚让我猜他参加了什么兴趣小组,我说:“()美术组,()航模组。” 5.()他不一定能来,我们()要通知他。 6.这里的花()很多,()没有奇花异草。 7.鲁迅先生()爱惜自己的时间,()爱惜别人的时间。 8.我们()可以看见铁丝网和胸墙,()可以看见火力点,()连敌人讲话都听得见。 9.()天气很冷,爷爷()要坚持早锻炼。 10.()我们现在不好好学习,将来()不能担当起建设祖国的重任。 11.很多同学在实践中体会到,()多读多写,作文()会有进步。 12.()困难有多大,我们()能克服。 13.()他热情地为同学们服务,()受到同学们的好评。 14.()你答应找小兰一起去看画展,()应该准时去找他。 15.刘胡兰()牺牲自己的生命,()说出党的机密。 16.放学后,我们()在街上乱跑,()回家读一读课外书。 17.我()知道这件事情,()并不了解事情的全过程。 18.()你去,()他去,总得有一个人去。 19.他()牺牲自己,()暴露党的组织。 20.同学们()走着,()谈论着。 21.()是什么人,谁向我们指出()行。 22.小李在学习上()有这么好的成绩,是()他平时刻苦学习的结果。23.()风浪再大,我()要把你送过河去。 24.王老师()关心我们的学习,()关心我们的身体。 25.()多读多练,()会提高作文水平。 26.我们的教室()宽敞()明亮。 27.现在我们的生活水平()有了提高,()还要注意节约。 28.()没有老师的耐心教育和帮助,我()不会有这么大的进步。 29.()芦花村的孩子们几乎都会凫水,()能像雨来游得这么好的却没有几个。30.()人人都献出一点爱,世界()会变成美好的人间。 31.()走到天涯海角,我()不会忘记自己的祖国。 32.凡卡()在城里受罪,()回到乡下爷爷那里去。 33.邱少云()牺牲自己,()暴露潜伏部队。 34.()工作再忙,他每天晚上()挤出时间学习英语。 35.每天上学,()王洁来找我,()我去找他,我俩总是结伴去学校。 36.他把他的大提包扔在一边,怀里()紧紧地抱着一个纸箱子。 37.()我做了充分准备,这次试验()没有成功。 38.()困难再大,我们()要按时完成任务。 39.()明天下雨,我们()下个星期再去游乐园吧。 40.()石块有多重,小草()要从下面钻出来。 41.我()说了,()不怕发表。 2003-2004学年七年级(上)数学试题 题 号 一二三四五六总分 1~8 9~20 21 22 23 24 25 26 27 28 29 得 分 信你在小学原有的基础上又掌握了许多新的数学知识与能力,变得更加聪明了,更加懂得应用数学来解决实际问题了。现在让我们一起走进考场,仔细思考,认真作答,成功将属于你——数学学习的主人。] 一、精心选一选!(只有一个正确答案,每小题4分,计32分) 1、下面几组数中,不相等的是( ) A、-3和+(-3) B、-5和-(+5) C、-7和-(-7) D、+2和│-2│ 2、平面上有任意三点,过其中两点画直线,共可以画() A、1条 B、3条 C、1条或3条 D、无数条 3、在数轴上表示a、b两数的点如图所示,则下列判断正确的是() A、a+b>0 B、a+b<0 C、ab>0 D、│a│>│b│ 4、下列图形中,哪一个是正方体的展开图() 5、2002年11月23—29日在泉州销售8000万元即开型福利彩票(每张面额2元),特等奖100万元,结果中一百万元者有15名,假如你花10元买5张,下列说法正确的是写() A、中一百万元是必然事件 B、中一百万元是不可能事件 C、中一百万元是可能事件,但可能性很小 D、因为5÷15=1/3,所以中一百万元的可能性是33.3% 6、计算(-1)1001÷(-1)2002所得的结果是() A、1/2 B、-1/2 C、1 D、-1 7、任何一个有理数的平方() A、一定是正数 B、一定不是负数 C、一定大于它本身 D、一定不大于它的绝对值 8、如图,AOC ∠和BOD ∠都是直角,如果 A C B O D 数据库系统概论习题集 第一章绪论 一、选择题 1. DBS是采用了数据库技术的计算机系统,DBS是一个集合体,包含数据库、计算机硬件、软件和()。 A. 系统分析员 B. 程序员 C. 数据库管理员 D. 操作员 2. 数据库(DB),数据库系统(DBS)和数据库管理系统(DBMS )之间的关系是()。 A. DBS 包括DB 和DBMS B. DBMS 包括DB 和DBS C. DB包括DBS和DBMS D. DBS 就是DB ,也就是DBMS 3. 下面列出的数据库管理技术发展的三个阶段中,没有专门的软件对数据进行管理的是()。 I ?人工管理阶段 II ?文件系统阶段 III ?数据库阶段 A. I 和II B. 只有II C. II 和III D. 只有I 4. 下列四项中,不属于数据库系统特点的是()。 A. 数据共享 B. 数据完整性 C. 数据冗余度高 D. 数据独立性高 5. 数据库系统的数据独立性体现在()。 A. 不会因为数据的变化而影响到应用程序 B. 不会因为系统数据存储结构与数据逻辑结构的变化而影响应用程序 C. 不会因为存储策略的变化而影响存储结构 D. 不会因为某些存储结构的变化而影响其他的存储结构 6. 描述数据库全体数据的全局逻辑结构和特性的是()。 A. 模式 B. 内模式 C. 外模式 D. 用户模式 7. 要保证数据库的数据独立性,需要修改的是()。 A. 模式与外模式 B. 模式与内模式 C. 三层之间的两种映射 D. 三层模式 8. 要保证数据库的逻辑数据独立性,需要修改的是()。 A. 模式与外模式的映射 B. 模式与内模式之间的映射 C. 模式 D. 三层模式 9. 用户或应用程序看到的那部分局部逻辑结构和特征的描述是(),它是模式的逻辑子集。 A. 模式 B. 物理模式 C. 子模式 D. 内模式 10. 下述()不是DBA 数据库管理员的职责。 A.完整性约束说明 B.定义数据库模式 C.数据库安全 D.数据库管理系统设计 选择题答案: (1) C (2) A (3) D (4) C (5) B (6) A (7) C (8) A (9) C (10) D 二、简答题 1 ?试述数据、数据库、数据库系统、数据库管理系统的概念。 数据:描述事物的符号记录称为数据。数据的种类有文字、图形、图象、声音、正文等等。数据与其语义是不可分的。 *解析: 一、选择题: 1.方程20 x=的解是() A.2 x=-B.0 x=C.1 2 x=-D. 1 2 x= 2.以下四个标志中,是轴对称图形的是() A.B.C.D. 3.解方程组 ? ? ? = + = - ② ① , . 10 2 2 3 2 y x y x 时,由②-①得() A.28 y=B.48 y=C.28 y -=D.48 y -= 4.已知三角形两边的长分别是6和9,则这个三角形第三边的长可能为()A.2 B.3C.7D.16 5.一个一元一次不等式组的解集在数轴上表示如右图,则此不等式组的解集是()A.x>3 B.x≥3 C.x>1 D.x≥1 6.将方程 3 1 2 2 1 + = - - x x去分母,得到的整式方程是() A.()()1 2 2 3 1+ = - -x x B.()()1 3 2 2 6+ = - -x x C.()()1 2 2 3 6+ = - -x x D.2 2 6 3 6+ = - -x x 7.在△ABC中,∠A∶∠B∶∠C=1∶2∶3,则△ABC的形状是()A.等腰三角形B.直角三角形C.等边三角形D.等腰直角三角形 8.已知x m =是关于x的方程26 x m +=的解,则m的值是()A.-3 B.3 C.-2 D.2 9.下列四组数中,是方程组 20, 21, 32 x y z x y z x y z ++= ? ? --= ? ?--= ? 的解是() A. 1, 2, 3. x y z = ? ? =- ? ?= ? B. 1, 0, 1. x y z = ? ? = ? ?= ? C. 0, 1, 0. x y z = ? ? =- ? ?= ? D. 0, 1, 2. x y z = ? ? = ? ?=- ? 。 · 4 3 2 -1 1 1.我们(与其把轮船停在港口,(不如冒着狂风暴雨前进。 2.(只有从小学好本领,(才更好地为国家建设出力。 3.鲁迅(不仅是伟大的文学家,(还是伟大的思想家和革命家。 4.(尽管今天下雨了,我们(还是要去探望李老师。 5.因为长城是那样雄伟壮丽,(所以吸引了很多游客。 6.一滴水(虽然很小很小,(但是无数滴水汇集起来,就可以形成江河湖海。 7.如果我们现在不好好学习,将来(就不能担当起建设祖国的重任。 8.很多同学在实践中体会到,(只要多读多写,作文(就会有进步。 9.(无论困难有多大,我们(都能克服。 10.(因为他热情地为同学们服务,(所以受到同学们的好评。 11.(如果你答应找小兰一起去看画展,(就应该准时去找他。 12.刘胡兰(宁可牺牲自己的生命,(也不说出党的机密。 13.我(虽然知道这件事情,(但是并不了解事情的全过程。 14.(要么你去,(要么他去,总得有一个人去。 15.他(宁可牺牲自己,(也不暴露党的组织。 16.同学们(一边走着,(一边谈论着。 17.(不管是什么人,谁向我们指出(都行。 18.小李在学习上(之所以有这么好的成绩,(是因为他平时刻苦学习的结果。 19.(不管风浪再大,我(都要把你送过河去。 20.王老师(不但关心我们的学习,(而且关心我们的身体。 21.(只要多读多练,(就会提高作文水平。 22.我们的教室(不但宽敞(而且明亮。 23.现在我们的生活水平(虽然有了提高,(但是还要注意节约。 24.(如果没有老师的耐心教育和帮助,我(就不会有这么大的进步。 25.(虽然芦花村的孩子们几乎都会凫水,(但是能像雨来游得这么好的却没有几个。 26.(只要人人都献出一点爱,世界(就会变成美好的人间。 27.(不管走到天涯海角,我(都不会忘记自己的祖国。 28.凡卡(宁可在城里受罪,(也不回到乡下爷爷那里去。 29.邱少云(宁可牺牲自己,(也不暴露潜伏部队。 30.(即使工作再忙,他每天晚上(也挤出时间学习英语。 31.每天上学,(要么王洁来找我,(要么我去找他,我俩总是结伴去学校。 32.他把他的大提包扔在一边,怀里(仍然紧紧地抱着一个纸箱子。 33.(虽然我做了充分准备,这次试验(但是没有成功。 34.(如果明天下雨,我们(就下个星期再去游乐园吧。 35.(不管石块有多重,小草(都要从下面钻出来。 36.王平和我同桌三年,(因此我很了解他。 数据库系统理论讲解(doc 32页) 数据库系统概论 本章目的在于使读者对数据库系统的基本知识能有一个较为全面的了解,为今后的学习和工作打下基础。本章重点介绍了有关数据库结构和数据库系统组织的基本知识和基本概念,以及常见的三种类型的数据库系统的特点。重点介绍关系数据库的有关知识。 1.1 数据管理技术发展史 随着生产力的不断发展,社会的不断进步,人类对信息的依赖程度也在不断地增加。数据作为表达信息的一种量化符号,正在成为人们处理信息时重要的操作对象。所谓数据处理就是对数据的收集、整理、存储、分类、排序、检索、维护、加工、统计和传输等一系列工作全部过程的概述。数据处理的目的就是使我们能够从浩瀚的信息数据海洋中,提取出有用的数据信息,作为我们工作、生活等各方面的决策依据。数据管理则是指对数据的组织、编码、分类、存储、检索 和维护,它是数据处理的一个重要内容中心。数据处理工作由来以久,早在1880年美国进行人口普查统计时,就已采用穿孔卡片来存储人口普查数据,并采用机械设备来完成对这些普查数据所进行的处理工作。电子计算机的出现以及其后其硬件、软件的迅速发展,加之数据库理论和技术的发展,为数据管理进入一个革命性阶段提供有力的支持。根据数据和应用程序相互依赖关系、数据共享以及数据的操作方式,数据管理的发展可以分为三个具有代表性的阶段,即人工管理阶段、文件管理阶段和数据库管理阶段。 【1】人工管理阶段 这一阶段发生于六十年代以前,由于当时计算机硬件和软件发展才刚刚起步,数据管理中全部工作,都必须要由应用程序员自己设计程序完成去完成。由于需要与计算机硬件以及各外部存储设备和输入输出设备直接打交道,程序员们常常需要编制大量重复的数据管理基本程序。数据的逻辑组织与它的物理组织基本上是相同的,因此当数据的逻辑组织、物理组织或存储设备发生变化时,进行数据管理工作的许多应用程序就必须要进行重新编制。这样就给数据管理的维护工 关联词练习题 小学语文关联词复习(一) 一、知识整理: 1、并列句(各分句间的关系是平行并列的)如:“这衣裳既漂亮,又大方。” 常用的关联词语有:又……又……、既……又……、一边……一边……、那么……那么……、是……也是……(不是)、不是……而是…… 2、承接句(各分句表示连续发生的事情或动作,分句有先后顺序)如:“看了他的示范动作后,我就照着样子做。” 常用的关联词语有:……接着……、……就……、……于是……、……又……、……便…… 3、递进句(分句间是进一层的关系)如:“海底不但景色奇异,而且物产丰富。” 常用的关联词语有:不但(不但)……而且……、不但……还……、……更(还)……、……甚至…… 4、选择句(各分句列出几种情况,从中选出一种)如:“我们下课不是跳橡皮筋,就是踢毽子。” 常用的关联词语有:不是……就是……、或者……或者……、是……还是……、要么……要么……、宁可(宁愿)……也不……、与其……不如…… 5、转折句(后一个分句与前一个分句的意思相反或相对,或部分相反)如:“虽然天气已晚,但是老师仍在灯下伏案工作。” 常用的关联词语有:虽然……但是……、即使……不过……、……不过……、……却…… 6、因果句(分句间是原因和结果的关系)如:“因为这本书写得太精彩了,所以大家都喜欢看。” 常用的关联词语有:因为(因为)……所以……、……因而(所以)……、既然……就……、之所以……是因为…… 7 、假设句(一个分句表示假设的情况,另一个分句表示假设实现后的结果)如:“如果明天下雨,运动会就不举行了。” 常用的关联词语有:如果……就……、即使……也…… 8、条件句(一个分句说明条件,另一个分句表示在这个个条件下产生的结果)如:“只要我们努力,成绩就会持续地提升。” 常用的关联词语有:只要……就……、无论(不管、不论)……也(都)……、只有……才……、凡是……都……、除非……才…… 1. (无论)是什么人,谁向我们指出(都)行。 2. 小李在学习上(所以)有这么好的成绩,是(因为)他平时刻苦学习的结果。 3. (即使)风浪再大,我(也)要把你送过河去。 4. 王老师(不但)关心我们的学习,(而且)关心我们的身体。 5. (只要)多读多练,(就)会提升作文水平。 初一上册数学第一单元试卷及答案 一、仔细选一选(30分) 1. 0是( ) A.正有理数 B.负有理数 C.整数 D.负整数 2. 中国第一座跨海大桥——杭州湾跨海大桥全长36千米,其中36属于( ) A.计数 B.测量 C.标号或排序 D.以上都不是 3. 下列说法不正确的是( ) A.0既不是正数,也不是负数 B.0的绝对值是0 C.一个有理数不是整数就是分数 D.1是绝对值最小的数 4. 在数- , 0 , 4.5, |-9|, -6.79中,属于正数的有( )个 A.2 B.3 C.4 D.5 5. 一个数的相反数是3,那么这个数是( ) A.3 B.-3 C. D. 6. 下列式子正确的是( ) A.2>0>-4>-1 B.-4>-1>2>0 C.-4<-1<0<2 D.0<2>-1<-4 7. 一个数的相反数是最大的负整数,则这个数是( ) A.1 B.±1 C.0 D.-1 8. 把数轴上表示数2的点移动3个单位后,表示的数为( ) A.5 B.1 C.5或1 D.5或-1 9. 大于-2.2的最小整数是( ) A.-2 B.-3 C.-1 D.0 10. 学校、家、书店依次座落在一条东西走向的大街上,学校在家的西边20米,书店在家东边100米,张明同学从家里出发,向东走了50米,接着又向西走了70米,此时张明的位置在( ) A. 在家 B. 在学校 C. 在书店 D. 不在上述地方 二、认真填一填(本题共30分) 11.若上升15米记作+15米,则-8米表示。 12.举出一个既是负数又是整数的数。 13.计算:__________。 14.计算5.24÷6.55,结果用分数表示是______;用小数表示是________。 初一数学下期末模拟试题及答案 一、选择题 1.已知平面内不同的两点A (a +2,4)和B (3,2a +2)到x 轴的距离相等,则a 的值为( ) A .﹣3 B .﹣5 C .1或﹣3 D .1或﹣5 2.如图,在平面直角坐标系xOy 中,点P(1,0).点P 第1次向上跳动1个单位至点P 1(1,1),紧接着第2次向左跳动2个单位至点P 2(﹣1,1),第3次向上跳动1个单位至点P 3,第4次向右跳动3个单位至点P 4,第5次又向上跳动1个单位至点P 5,第6次向左跳动4个单位至点P 6,….照此规律,点P 第100次跳动至点P 100的坐标是( ) A .(﹣26,50) B .(﹣25,50) C .(26,50) D .(25,50) 3.为了绿化校园,30名学生共种78棵树苗,其中男生每人种3棵,女生每人种2棵,设男生有x 人,女生有y 人,根据题意,所列方程组正确的是( ) A .783230x y x y +=??+=? B .78 2330x y x y +=??+=? C .30 2378x y x y +=??+=? D .30 3278x y x y +=??+=? 4.若|321|20x y x y --++-=,则x ,y 的值为( ) A .1 4x y =??=? B .2 0x y =??=? C .0 2x y =??=? D .1 1x y =??=? 5.如图,如果AB ∥CD ,那么下面说法错误的是( ) A .∠3=∠7 B .∠2=∠6 C .∠3+∠4+∠5+∠6=180° D .∠4=∠8 6.不等式4-2x >0的解集在数轴上表示为( ) A . B . C . D . 7.如图,已知∠1+∠2=180°,∠3=55°,那么∠4的度数是( ) 小学语文关联词练习题 1.我们(与其)把轮船停在港口,(不如)冒着狂风暴雨前进。 2.(只有)从小学好本领,(才)更好地为国家建设出力。 3.鲁迅(不仅)是伟大的文学家,(还)是伟大的思想家和革命家。 4.(尽管)今天下雨了,我们(还是)要去探望李老师。 5.(因为)长城是那样雄伟壮丽,(所以)吸引了很多游客。 6.一滴水(虽然)很小很小,(但是)无数滴水汇集起来,就可以形成江河湖海。 7.如果)我们现在不好好学习,将来(就)不能担当起建设祖国的重任。 8.很多同学在实践中体会到,(只要)多读多写,作文(就)会有进步。 9.(无论)困难有多大,我们(都)能克服。 10.(因为)他热情地为同学们服务,(所以)受到同学们的好评。 11.(如果)你答应找小兰一起去看画展,(就)应该准时去找他。 12.刘胡兰(宁可)牺牲自己的生命,(也不)说出党的机密。 13.我(虽然)知道这件事情,(但是)并不了解事情的全过程。 14.(要么)你去,(要么)他去,总得有一个人去。 15.他(宁可)牺牲自己,(也不)暴露党的组织。 16.同学们(一边)走着,(一边)谈论着。 17.(不管)是什么人,谁向我们指出(都)行。18.小李在学习上(之所以)有这么好的成绩,(是因为)他平时刻苦学习的结果。 19.(不管)风浪再大,我(都)要把你送过河去。 20.王老师(不但)关心我们的学习,(而且)关心我们的身体。 21.(只要)多读多练,(就)会提高作文水平。 22.我们的教室(不但)宽敞(而且)明亮。 23.现在我们的生活水平(虽然)有了提高,(但是)还要注意节约。 24.(如果)没有老师的耐心教育和帮助,我(就)不会有这么大的进步。 25.(虽然)芦花村的孩子们几乎都会凫水,(但是)能像雨来游得这么好的却没有几个。26.(只要)人人都献出一点爱,世界(就)会变成美好的人间。 27.(不管)走到天涯海角,我(都)不会忘记自己的祖国。 28.凡卡(宁可)在城里受罪,(也不)回到乡下爷爷那里去。 29.邱少云(宁可)牺牲自己,(也不)暴露潜伏部队。 30.(即使)工作再忙,他每天晚上(也)挤出时间学习英语。 31.每天上学,(要么)王洁来找我,(要么)我去找他,我俩总是结伴去学校。 32.他把他的大提包扔在一边,怀里(仍然)紧紧地抱着一个纸箱子。 33.(虽然)我做了充分准备,这次试验(但是)没有成功。 34.(如果)明天下雨,我们(就)下个星期再去游乐园吧。 35.(不管)石块有多重,小草(都)要从下面钻出来。 36.王平和我同桌三年,(因此)我很了解他。 37.我们一定要把京张铁路修好,否则(不但)那些外国人会讥笑我们,(而且)会使中国工程师失去信心。 38.他干的活计(不但)速度快,(而且)质量好。39.(只有)这种草,(才)是坚韧的草。 40.这艘轮船(不但)载客多,(而且)速度非常快。 三、数据库的概念与用途 数据库的概念 什么是数据库呢当人们从不同的角度来描述这一概念时就有不同的定义(当然是描述性的)。例如,称数据库是一个“记录保存系统”(该定义强调了数据库是若干记录的集合)。又如称数据库是“人们为解决特定的任务,以一定的组织方式存储在一起的相关的数据的集合”(该定义侧重于数据的组织)。更有甚者称数据库是“一个数据仓库”。当然,这种说法虽然形象,但并不严谨。严格地说,数据库是“按照数据结构来组织、存储和管理数据的仓库”。在经济管理的日常工作中,常常需要把某些相关的数据放进这样“仓库”,并根据管理的需要进行相应的处理。例如,企业或事业单位的人事部门常常要把本单位职工的基本情况(职工号、姓名、年龄、性别、籍贯、工资、简历等)存放在表中,这张表就可以看成是一个数据库。有了这个“数据仓库”我们就可以根据需要随时查询某职工的基本情况,也可以查询工资在某个范围内的职工人数等等。这些工作如果都能在计算机上自动进行,那我们的人事管理就可以达到极高的水平。此外,在财务管理、仓库管理、生产管理中也需要建立众多的这种“数据库”,使其可以利用计算机实现财务、仓库、生产的自动化管理。 给数据库下了一个比较完整的定义:数据库是存储在一起的 相关数据的集合,这些数据是结构化的,无有害的或不必要的冗余,并为多种应用服务;数据的存储独立于使用它的程序;对数据库插入新数据,修改和检索原有数据均能按一种公用的和可控制的方式进行。当某个系统中存在结构上完全分开的若干个数据库时,则该系统包含一个“数据库集合”。 数据库的优点 人事基本档案 使用数据库可以带来许多好处:如减少了数据的冗余度,从而大大地节省了数据的存储空间;实现数据资源的充分共享等 数学试卷 (用时:60分钟) 卷首语:亲爱的同学,希望你好好思考,好好努力,交上一份满意的答卷! 项 目 一 二 三 四 五 六 总 分 得 分 一、填空:(每题3分,共42分) 1、三个连续奇数,中间一个是a ,另外两个分别是 、 。 2、用0、5、3这三个数字组成一个两位数,使它同时是2、 3、5的倍数,这个数是 。 3、一个数十万位上是最大的一位数字,万位上是最小的合数,百位上是一偶质数,其余各位都是0, 这个数写作 ,改写成以“万”为单位的数是 。 4、如果小明向东走28米记作+28米,那么-50米表示小明向 走了 米。 5、250千克∶0.5吨化成最简整数比是 : ,比值是 。 6、18的因数中有 个素数、 个合数;从18的因数中 选出两个奇数和两个偶数,组成一个比例式是 。 7、如右图,一个半径为1厘米的圆沿着一个直角三角形的三边滚动一周, 那么这个圆的圆心所经过的总路程为 厘米。取3π≈ 8、小明、小惠、小强是同一小区的三个小伙伴,在小学某年级时,小明的年龄是小惠和小强两人的平均数。现在小明小学毕业了,长成了一个13岁的少年,而小惠现在11岁,那么小强现在 岁 9、如图,大长方形的长和宽分别为19厘米和13厘米, 形内放置7个形状、大小都相同的小长方形, 那么图中阴影部分的面积是 平方厘米 10、 如左图所示,把底面周长18.84厘米、 高10厘米的圆柱切成若干等分,拼成一个近似的长方体,表面积 比原来增加了 平方厘米,体积是 立方厘米。 11、哥哥和弟弟周末分别骑车去森林动物园游玩,下左面的图像表示他们骑车的路程和时间的关系,请 根据哥哥、弟弟行程图填空。 ①哥哥骑车行驶的路程和时间成 比例。 30 ②弟弟骑车每分钟行 千米。 20 10 O 12、右图檀香扇面上有两个空格,请你按已知数字的规律, 在空格内各填上一个数字,分别是 和 。 13、买2千克荔枝和3千克桂圆,共付40元。已知2千克荔枝的价钱等于1千克桂圆的价钱。荔枝每 千克 元,桂圆每千克 元。 14、今年某班有56人订阅过《时代数学报》,其中,上半年有25名男生、15名女生订阅了该报纸,下 3:00 路程(千米) 2:00 2:20 2:40 3:20 3:40 时间 哥 弟 毕业学校 班级 姓名 面试号 关联词语的使用: (1)一般方法:初读句子,弄清分句之间的关系。选择关联词语,填入句子。在读句子,检查句子是否通顺,句意是否正确。 (2)两个注意点 搭配要得当:使用一组关联词语是要前后呼应,要"成双配对",不能交叉使用,这样才能是句意畅通、明确。 运用要合理:该用的时候用,不该用的时候就不用,不要生搬硬套。根据句子表达的需要,正确的选择关联词语。 练习题: 1、选择关联词语填空。 不是……就是…… 不但……而且…… (1)小敏的课外活动丰富多彩,每天放学后()到图书馆看书,()到科技小组活动。(2)我和张平是好朋友,暑假里()我到他家去玩,()他到我家来做作业。 (3)激光作为一种新兴的人造广源,()可用于科研、军事、医学方面,()可用于通讯、教育、宣传等方面。 因为……所以…… 如果……就…… (1)()他学习刻苦,工作认真,积极参加体育锻炼,()被评为"三好"学生。 (2)()我说得不对,()请你给我指出来。 (3)()我们往足球里打气,足球()变得硬梆梆的了。 不是……而是…… 即使……也…… (1)()我们的生活条件很好,()不能丢掉勤俭节约的好传统。 (2)台湾()独立的国家,()中华人民共和国领土不可分割的一部分。 (3)这次接力赛我们落后了,()我们跑得太慢,()接棒不够默契。 宁可……也不…… 与其……不如…… (1)江姐()牺牲自己,()泄露党的机密。 (2)凡卡()在莫斯科的鞋铺受折磨,()回到乡下爷爷那里去。 (3)凡卡()回到乡下与爷爷一起吃苦,()愿留在莫斯科的鞋铺。 2、选择关联词语填空。 (1)虽然……但是…… 不管……也…… 与其……不如…… 之所以……是因为…… 放学后,我们()在街上乱跑,()回家读书。 ()怎样风浪再大,我()要送你过河去。 这里的花()很多,()没有奇花异草。 小明在学习上()有这么好的成绩,()他平时的刻苦学习。 (2)即使……也…… 既然……就…… 只要……就…… 不仅……还…… 虽然……可是…… 因为……所以…… 爸爸()技术高明,()积极肯干。再难的活儿,()一到爸爸的手里,()能化难为易。()是别人不愿意干的活儿,他()从不推辞。他觉得做难度大的活儿()人累一点,()能提高自己的技术。 3、填入恰当的关联词中级数据库系统工程师试题、答案及详细解析
最新初一数学试题及答案
关联词语练习题及答案
初一数学期末试卷及答案
(完整版)数据库原理和应用教程第4版习题参考答案与解析
2016-2017年初一数学期中试题及答案
关联词练习题及答案
七年级上数学试卷及答案
(完整版)数据库系统原理与设计(万常选版)整本书练习题和详细答案详解
七年级数学试卷含答案
关联词练习题(含答案).
数据库系统理论讲解(doc 32页)
小学语文关联词练习题
初一上册数学 试卷及答案
初一数学下期末模拟试题及答案
小学语文关联词练习题及答案
数据库系统基本知识讲解
初一入学数学考试试卷含答案
小升初关联词语练习及答案